Alla Prima Primer — User Guide
Contents
Welcome
Alla Prima Primer turns a reference photo into a plan for an alla prima oil painting, then checks your painting against it. It answers the questions you ask before and during a session: is the reference good enough, what are the big shapes, where do the values split, which colors are warm or cool, how does the light turn each form, which edges stay hard, and how do you mix each color.
Alla prima oil painting
Alla prima is Italian for "at the first attempt". An alla prima oil painting is painted wet-into-wet, usually in a single session, instead of being built up in layers that dry between sittings. Each stroke goes down close to its final value, color and edge and is meant to stay, so the thinking happens before the brush touches the canvas: the design, the value plan, the mixes and the order of work. Painters also call it direct painting, or au premier coup in French.
Working wet-into-wet has its own order, and the app follows it:
Big to small. Block in the large shapes first, then the masses, and finish with the details and accents.
Dark to light. Lay in the shadows first, then the midtones, then the lights, so the lights stay clean.
Thin to thick. Thin, transparent paint in the shadows, opaque paint in the midtones, and thick paint in the lights, thickest on the highlights. Thick paint laid over thin stays clean; thin paint over thick picks up what is underneath.
One stroke, one decision. Mix each note on the palette, put it down and leave it. Wet paint worked over and over turns to mud.
The 13 modules run in the order you paint. You can use them in any order, but each one builds on the crop you make in Reference and the edits you make in Adjust.
| # | Module | The question it answers | When to use it |
|---|---|---|---|
| 1 | Reference | Is this a good reference, cropped to my canvas? | First, every time |
| 2 | Adjust | Do the lights and shadows hold detail, and is the color true? | Right after cropping |
| 3 | Analyze | Which colors make this picture, and how do I mix them? | Choosing your palette |
| 4 | Value | Where does each value fall, and how do the values describe the light? | Planning the values |
| 5 | Notan | Does the light-and-shadow design read? | Before you draw |
| 6 | Temperature | Where is it warm or cool, in the lights, midtones and shadows? | Planning mixes and toning the canvas |
| 7 | Simplify | What are the big shapes, and in which layer do I paint each one? | Planning and during the block-in |
| 8 | Drawing | Where do the lines, angles, proportions and shadow shapes go? | Drawing on the canvas |
| 9 | Form & modeling | How does the light turn each form, as value planes, and which brush lays each stroke? | Planning the modeling and brushwork |
| 10 | Edges | Which edges are hard, soft or lost? | Before and while refining |
| 11 | Color mixing | What do I premix, and what do I add for light and shadow? | Setting up the palette |
| 12 | Color check | How do I mix this exact color, and is my mix right? | At the easel |
| 13 | Proportion check | Is my painting on track? | During and after painting |
Two conventions run through the app. Value is on the Munsell scale, 0 (black) to 10 (white), except where steps are numbered: the 10-step value chart runs from 1 (darkest) to 10 (lightest), and the Five-value notan from 1 to 5. Mixes are modeled from the photo, so treat every recipe as a starting point and judge the final color by eye under your painting light.
Everything runs on your device. Photos are never uploaded, and projects are saved in the browser on the device you use.
Getting started
Open a photo, crop it to your canvas in Reference, fix the photo in Adjust, set your palette in Paints, then work down the module list. The app saves as you go.
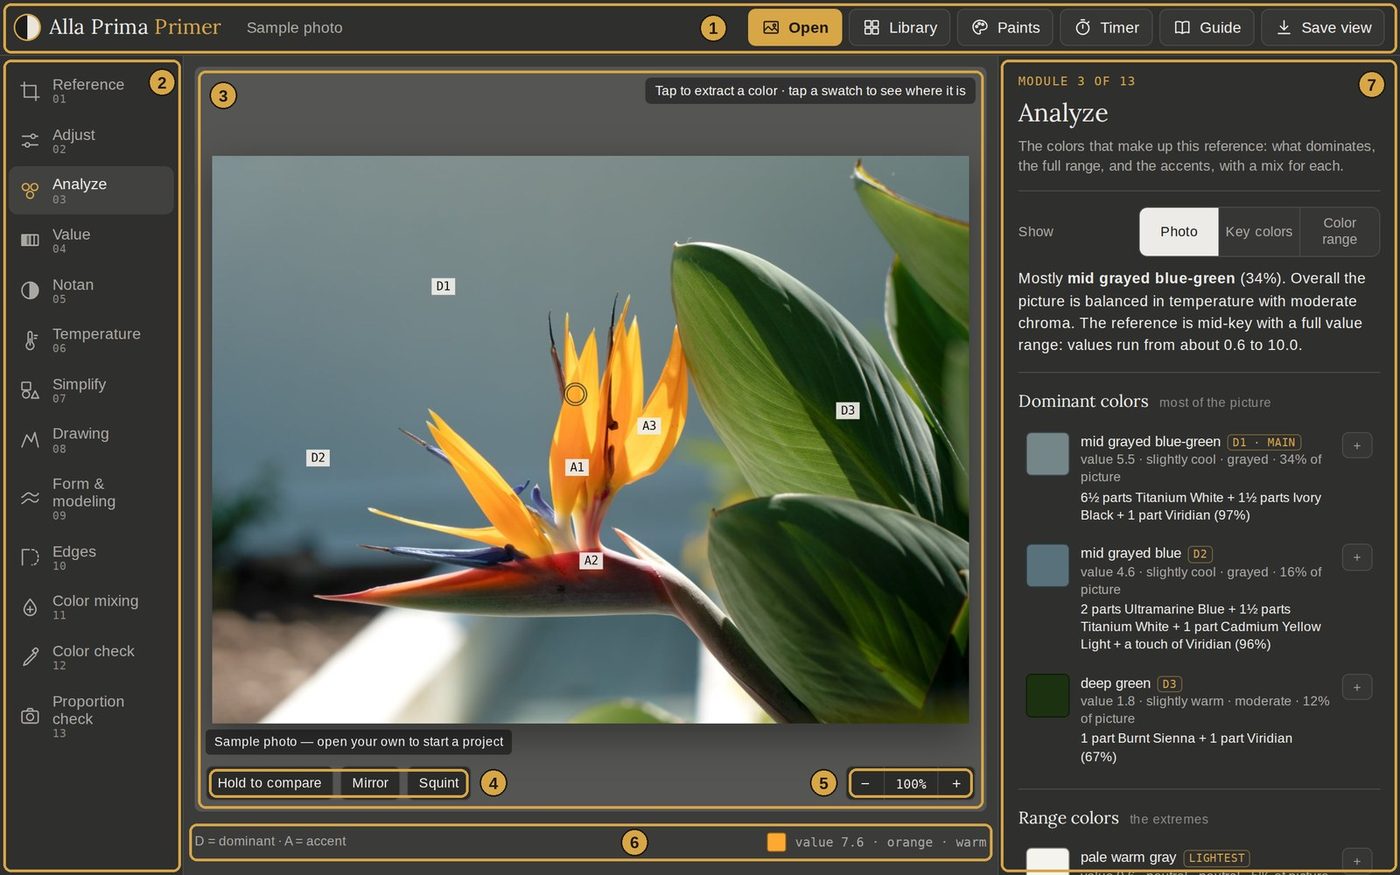
| # | Part | What it does |
|---|---|---|
| 1 | Top bar | Open, Library, Paints, Timer, Guide and Save view are always here. Guide opens this User Guide. On wider screens the project name shows too; tap it to rename the project. |
| 2 | Module list | The 13 modules in painting order. On a phone or tablet it becomes a strip you swipe sideways. |
| 3 | Stage | Your reference as the current module sees it. Tap to read a color; drag to fine-tune with the magnifier. |
| 4 | Hold to compare, Mirror, Squint | Hold to flash the photo (or hold the space bar). Mirror flips the picture so you see the design fresh. Squint blurs the view the way half-closed eyes do: small details drop away and the big value masses show. It also gives an idea of how the painting will look with its brushstrokes blended, the way strokes merge when you step back from the easel. |
| 5 | Zoom | Pinch or scroll to zoom. Drag with two fingers, or with the right mouse button, to move around. The middle button fits the picture again. |
| 6 | Legend and readout | What the colors and marks mean in this view. On the right: value, hue and temperature of the last color you tapped. |
| 7 | Panel | The controls and results for the module. Back and Next at the bottom walk you through the modules in order. |
Open a reference
Tap Open, or Open photo… in Reference. On a phone or tablet, Take photo opens the camera.
Each photo becomes a project in the Library, with its crop, edits, settings, colors, plan and measurements. Projects stay in this browser on this device; they don't sync between devices.
Use the sample opens the built-in bird of paradise photo on a 9 × 12 in (23 × 30 cm) landscape canvas. Most illustrations in this guide use it, so you can follow along. Notan, Temperature and Color check also use a Yellowstone landscape, and Form & modeling and Edges a singing flycatcher.
Choose a reference with defined light and shadow. Reference explains what to look for, and Adjust fixes what the camera got wrong.
Set your palette first
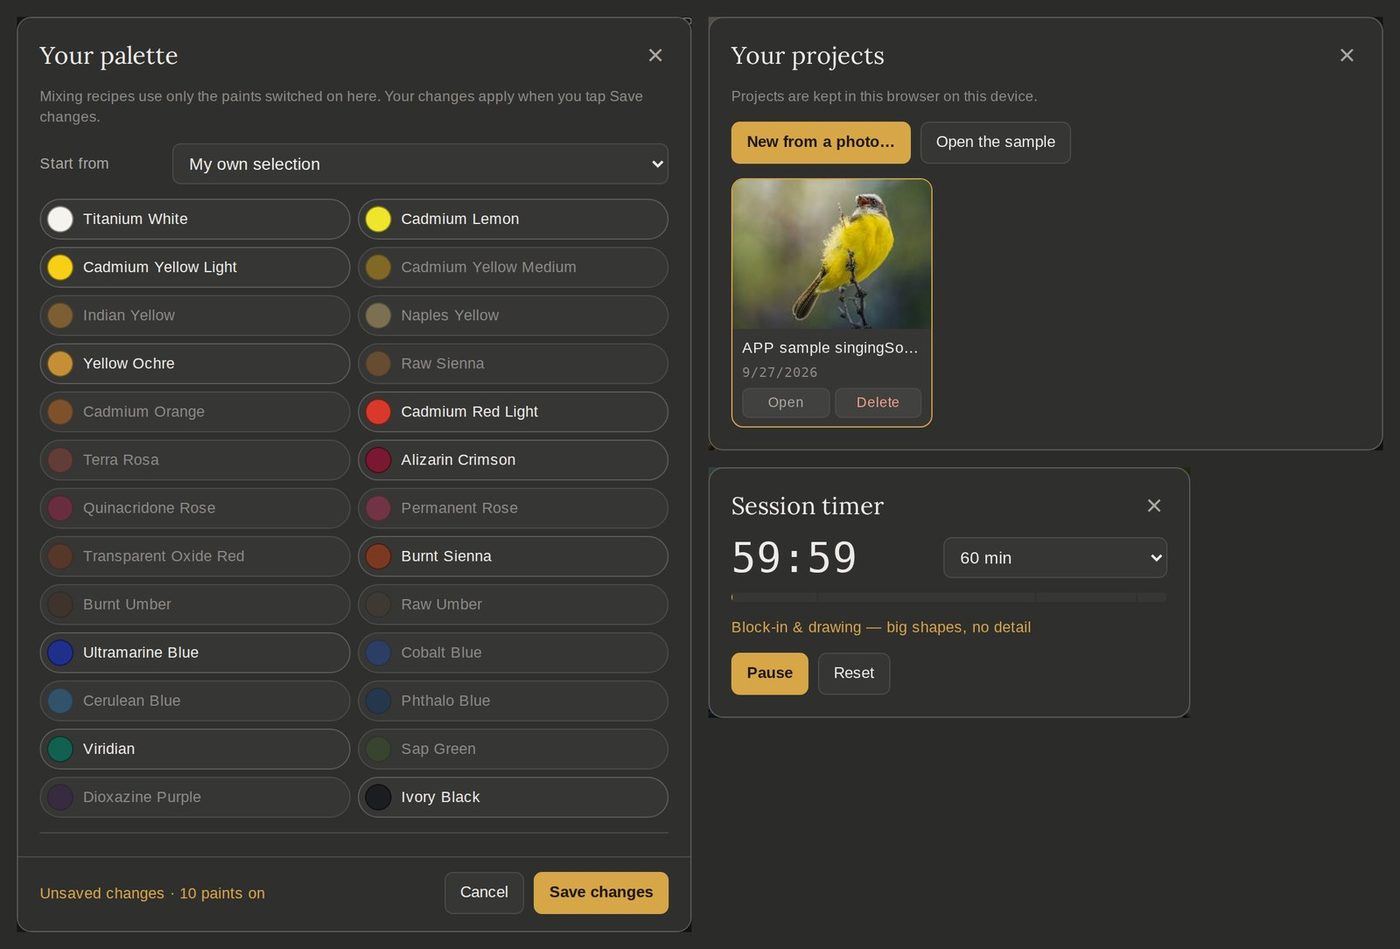
Every recipe in the app uses only the paints switched on in Paints, so set this before you look at any mixes. Pick a starting palette, then tap paints to add or remove them. Tap Save changes to apply them: until you do, the footer reads "Unsaved changes", and Cancel leaves your palette as it was. If you close the window with unsaved changes, it warns you first; close it again to discard them. Your palette is kept in this browser and used by every project.
| Starting palette | Paints |
|---|---|
| Standard studio | Titanium White, Cadmium Yellow Light, Yellow Ochre, Cadmium Red Light, Alizarin Crimson, Ultramarine Blue, Burnt Sienna, Viridian, Ivory Black |
| Limited four-color (Zorn) | Titanium White, Yellow Ochre, Cadmium Red Light, Ivory Black |
| Split primary | Titanium White, Cadmium Lemon, Cadmium Yellow Light, Cadmium Red Light, Quinacridone Rose, Ultramarine Blue, Phthalo Blue |
| Earth & ultramarine | Titanium White, Yellow Ochre, Burnt Sienna, Burnt Umber, Ultramarine Blue, Cadmium Red Light |
| Expanded warm & cool | Titanium White, Cadmium Lemon, Cadmium Yellow Light, Indian Yellow, Cadmium Red Light, Terra Rosa, Alizarin Crimson, Permanent Rose, Transparent Oxide Red, Viridian, Cobalt Blue, Ultramarine Blue |
The full list has 26 paints, including Indian Yellow and Permanent Rose. To add a paint you own, use Add your own paint: a name in the form "Brand Name / Color Name", its color and its tinting strength. Strong paints such as phthalos and dioxazine are 2 to 3; earths are about 0.8. For the color, photograph a thick swatch, pick it in Color check and copy the hex code. Then tap Save changes.
Timer and saving
Timer runs a session of 20 minutes to 3 hours. It chimes at four phases: block-in and drawing (the first 20%), modeling the forms, dark to light and thin to thick (to 70%), refining edges and details (to 93%), then accents and highlights.
Save view saves exactly what the stage shows as a PNG. Analyze, Drawing and Color mixing add their own saves: a palette card, a CSV, a line drawing (PNG, or SVG that prints to size) and a plan card.
Saved files go to your browser's downloads. Some browsers ask you to confirm each save first.
On a phone or tablet
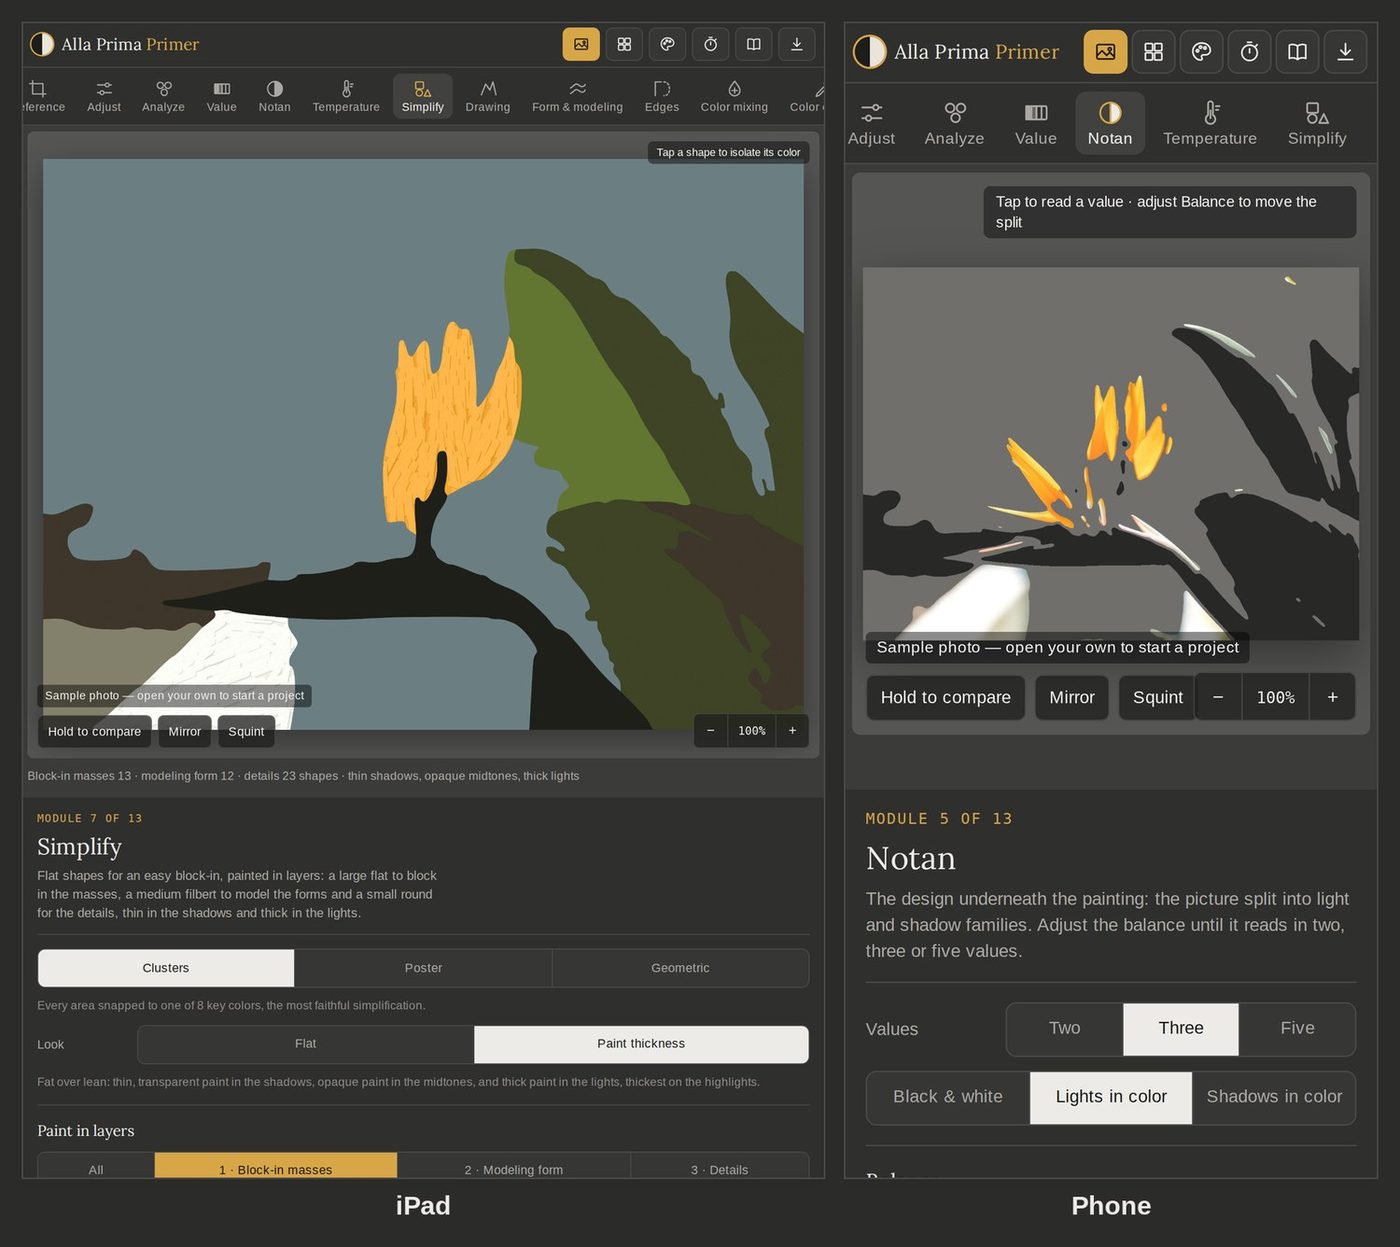
The layout stacks: modules across the top, the stage, then the panel. Scroll down for the controls. The iPad shows Simplify's block-in layer with Paint thickness; the phone shows Notan with the lights in color.
The app runs in any modern browser on a phone, tablet or computer. Install it to open it full-screen from your home screen, paint offline, and use the live camera in Proportion check. The installed app includes this guide, so Guide opens it even offline. Open the app's web address first, then:
On iPhone or iPad, in Safari, tap Share, then Add to Home Screen.
On Android, in Chrome, choose Install app, or use the install button in Library.
On a Mac or PC, click the install icon at the right of the Chrome or Edge address bar.
Keyboard shortcuts
| Key | Action |
|---|---|
| Space (hold) | Show the photo |
| M | Mirror |
| S | Squint |
| + / − / 0 | Zoom in, zoom out, fit |
| Alt + → / Alt + ← | Next or previous module |
| Ctrl + Z or ⌘ + Z | Undo the last measurement in Drawing |
| Esc | Close a dialog |
1 · Reference
Reference crops your photo to the shape of your canvas and helps you judge whether the photo is worth painting from. Use it first on every project, because every other module works on this crop.
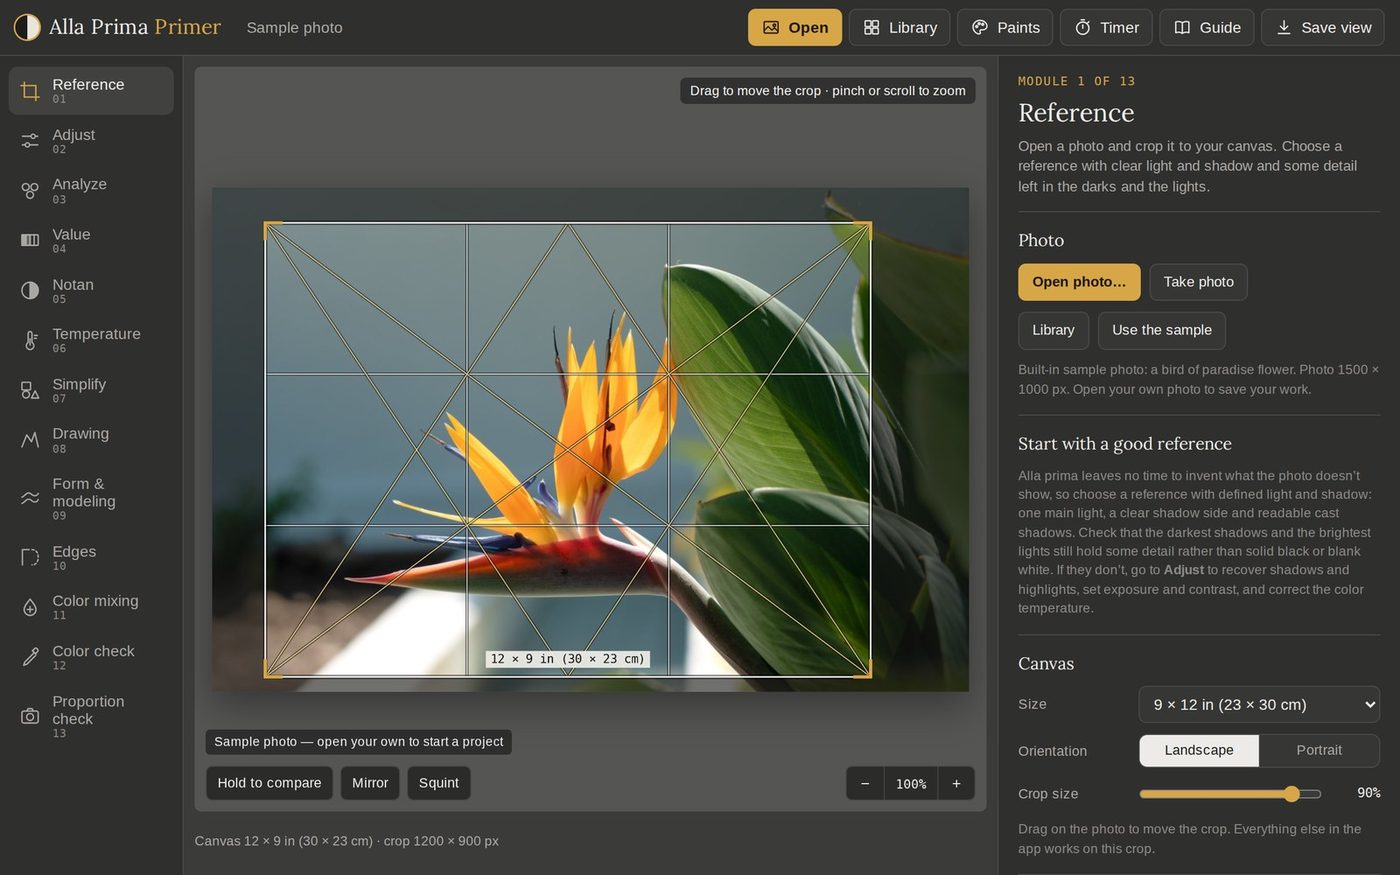
Start with a good reference. Alla prima leaves no time to invent what the photo doesn't show, so every decision at the easel rests on the reference. Choose a photo with defined light and shadow: one main light, a clear shadow side and readable cast shadows.
Then check the extremes. The darkest shadows should still hold some detail rather than solid black, and the brightest lights some texture rather than blank white. If either fails, go to Adjust, the next module, to recover the shadows and highlights, set exposure and contrast, and correct the color temperature.
When: at the start of each project, and again whenever you change canvas size or rethink the composition.
How:
Open a photo, or tap Use the sample.
Under Canvas, choose a Size. Every size shows inches and centimeters, such as 9 × 12 in (23 × 30 cm), and metric canvases such as 30 × 40 cm are listed too. Then choose Landscape or Portrait, or Photo proportions to keep the photo's own shape.
Set Crop size and drag on the photo to move the crop. The label on the frame shows the canvas size.
Under Guides, choose a Grid and read the note beneath it. It gives the grid positions on your real canvas, for example "the thirds fall at 4 in (10.2 cm) and 8 in (20.3 cm) across, 3 in (7.6 cm) and 6 in (15.2 cm) down."
Turn on Show guides in every module to keep the grid while you work in other modules.
| Guide | Use it to |
|---|---|
| Rule of thirds | Place the focal point near a third line or where two cross. |
| Golden section | Make a quieter, more classical placement, at 38% and 62%. |
| Squares | Transfer the drawing square by square. The note gives the square size on your canvas. |
| Equal divisions | Split both sides into 2 to 12 equal parts for transferring proportions. |
| Diagonals & armature | Check the main diagonals and lines of movement through the rectangle. |
Tips:
Pick a real canvas size even if you haven't cut the panel yet. It turns on real measurements elsewhere, in inches and centimeters: brush widths in Simplify and Form & modeling, and positions in Drawing.
Crop out anything you won't paint. The crop is your design decision, and a tighter crop gives the other modules more detail to work with.
Hold Hold to compare in any later module to flash back to the photo.
2 · Adjust
Adjust edits the reference before you plan the painting, so the photo shows defined light and shadow with detail left in the darks and the lights. The edits carry through every module.
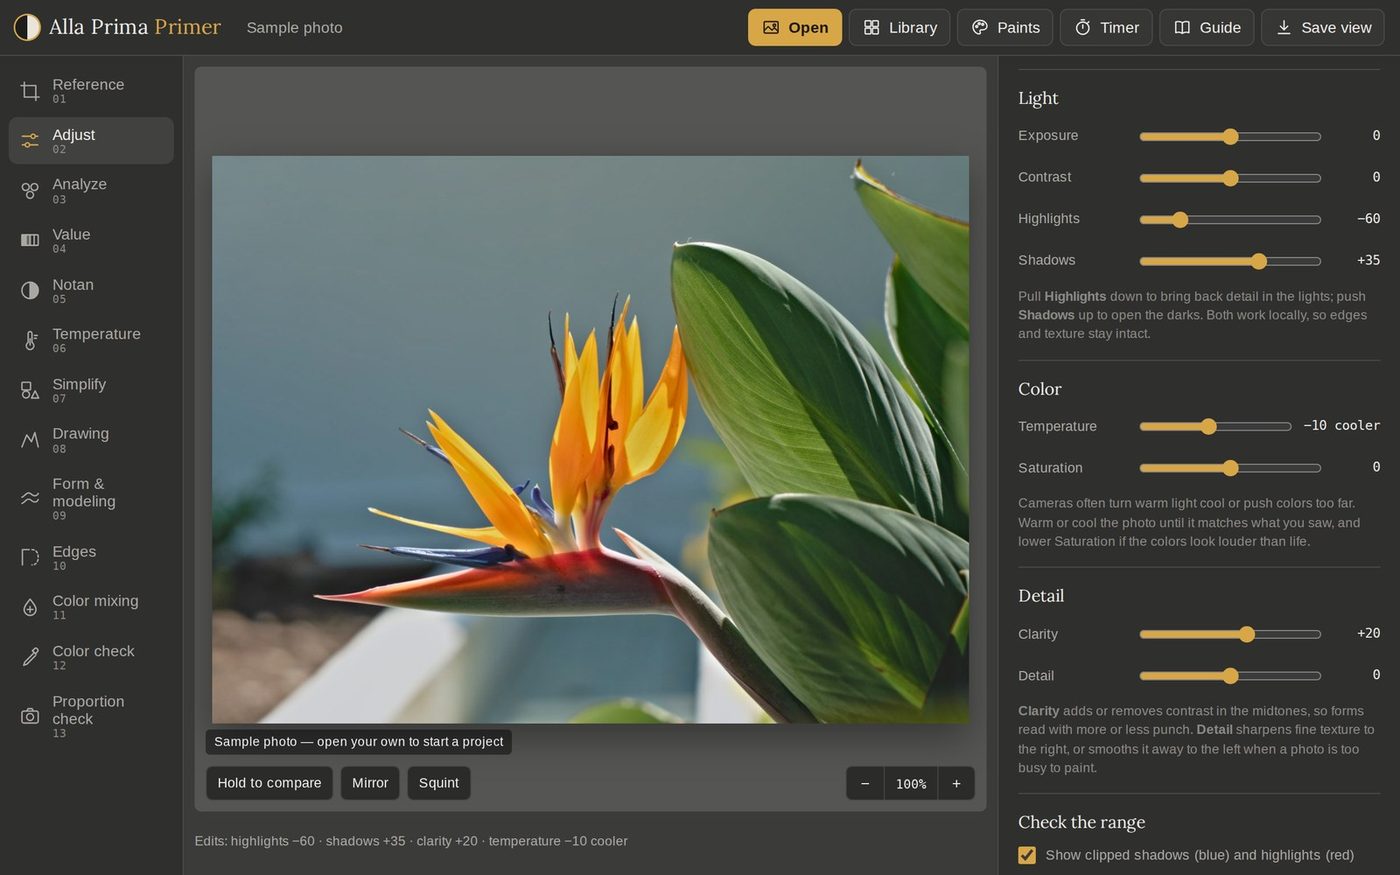
When: right after you crop, before any planning. Come back if a later module shows a problem, such as a notan that breaks into specks or temperatures that don't match what you saw.
| Group | Tool | What it does |
|---|---|---|
| Light | Exposure | Brightens or darkens the whole photo, in camera stops from −2 to +2. |
| Light | Contrast | Spreads the values apart, or pulls them closer together. |
| Light | Highlights | Pull left to bring back detail in the lights; push right to brighten them. |
| Light | Shadows | Push right to open the darks; pull left to deepen them. |
| Color | Temperature | Warms (right) or cools (left) the whole photo, to undo the camera's white balance. |
| Color | Saturation | Mutes (left) or intensifies (right) every color. |
| Detail | Clarity | Adds or removes contrast in the midtones, so forms read with more or less punch. |
| Detail | Detail | Sharpens fine texture (right), or smooths it away (left) when a photo is too busy to paint. |
Every slider except Exposure runs from −100 to +100. Highlights and Shadows work locally, so edges and texture stay intact.
Check the range:
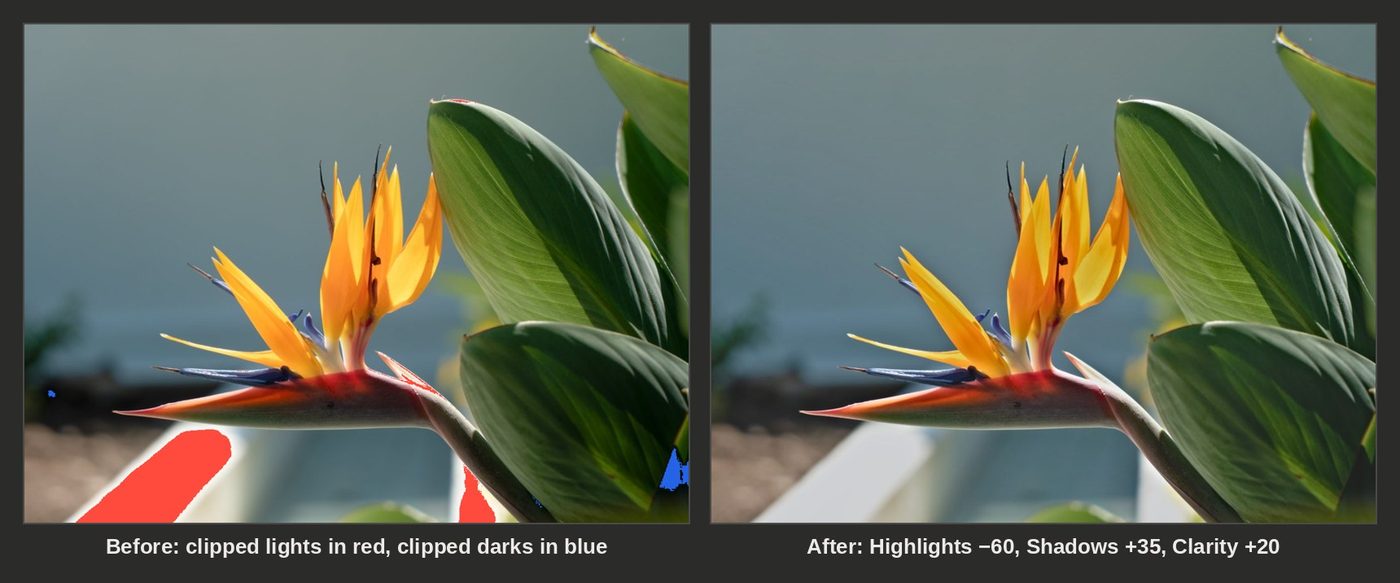
Turn on Show clipped shadows (blue) and highlights (red). Pure black turns blue on the stage, and pure white turns red.
Read the note under the histogram. For the sample it says "3% is pure white: pull Highlights down to recover the lights."
Adjust until the note reads "The shadows and the highlights both hold detail, a good range to paint from." For the sample, Highlights −60 and Shadows +35 did it: the values now run from about 1.5 to 8.3 instead of 0.6 to 10.
Compare and reset: hold Hold to compare to see the photo as it was taken. Double-click a slider to set it back to zero, and Reset all clears every edit. The legend under the stage lists your edits.
Tips:
Recover first, then shape: fix clipped highlights and shadows before you touch Contrast or Clarity.
Aim for the scene as you saw it, not a dramatic photo. Strong Clarity or Saturation exaggerates what you will paint.
Cameras often turn warm light cool. If you remember a warm afternoon, warm the photo: Temperature and Color mixing plan from these colors.
3 · Analyze
Analyze lists the colors that build the picture, with a starting mix for each, and lets you pick any color into your own palette.
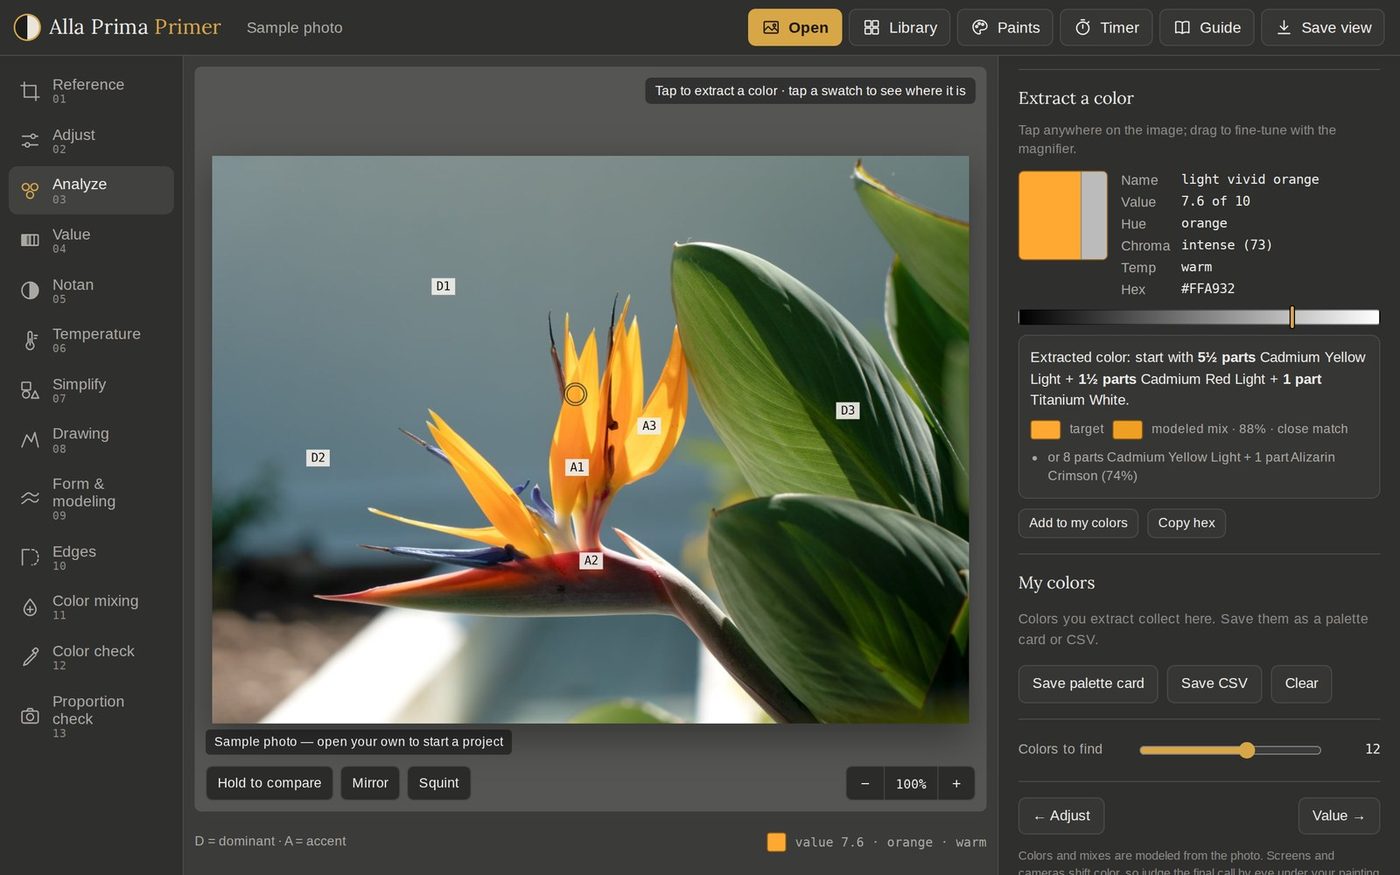
When: before you squeeze out paint, to choose the palette and understand the key. Come back whenever you need to know what a color is and how to mix it.
What it tells you:
The summary names the main color, overall temperature, chroma and key. For the sample: "Mostly mid grayed blue-green (34%)… balanced in temperature with moderate chroma… mid-key with a full value range: values run from about 0.6 to 10.0."
Dominant colors (D1 to D3) cover most of the picture. D1 is marked Main. These are your big masses, so premix them.
Range colors are the extremes: lightest, darkest, warmest, coolest, most intense and most neutral. They set the limits of your palette.
Accent colors (A1 to A3) are small areas of strong or contrasting color. Save them for the end and the focal point. If none are found, the reference is quiet; consider adding one note of stronger color.
Value range is a histogram of values. The ochre bar marks the range and the line marks the middle value.
Every color shows its value (0 to 10), temperature, chroma, share of the picture and a recipe. Tap a swatch to see where that color sits in the picture; tap + to keep it.
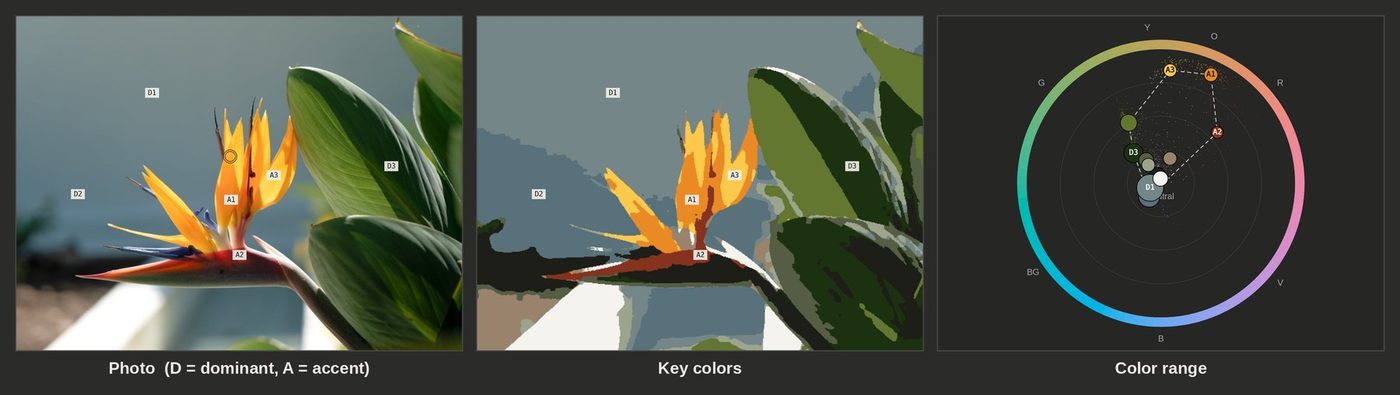
| Show | What you see |
|---|---|
| Photo | Your crop, with D and A labels where each dominant and accent color occurs. |
| Key colors | The picture repainted in only the colors found. Colors to find sets how many (6 to 16). |
| Color range | A color wheel: hue around the ring, chroma outward. The dashed line is the gamut of this reference, and D and A mark the dominant and accent colors. The key to these marks is under the Show buttons. |
Extract a color:
Tap the image. Drag to fine-tune with the magnifier.
The card shows the color's name, value, hue, chroma, temperature and hex code, a value bar, and a starting recipe with up to two alternatives. For the lit petal: light vivid orange, value 7.6, "5½ parts Cadmium Yellow Light + 1½ parts Cadmium Red Light + 1 part Titanium White", an 88% match.
Tap Add to my colors to collect it, or Copy hex.
Under My colors, Save palette card saves a PNG of your picks with recipes. Save CSV saves them as a list. Clear needs a second tap.
Reading a recipe: parts are by volume on your knife, and "a touch" is a knife-tip. The percentage is the modeled match: 88% and up is a close match, 76% to 87% is near (adjust by eye), and 75% or less means the color is outside this palette's reach. Add a paint in Paints if a color you need keeps scoring low.
4 · Value
Value shows the reference in values only, from black to white, underneath the photo. It groups the values into as few steps as you like, and a 10-step chart finds any value on the picture.
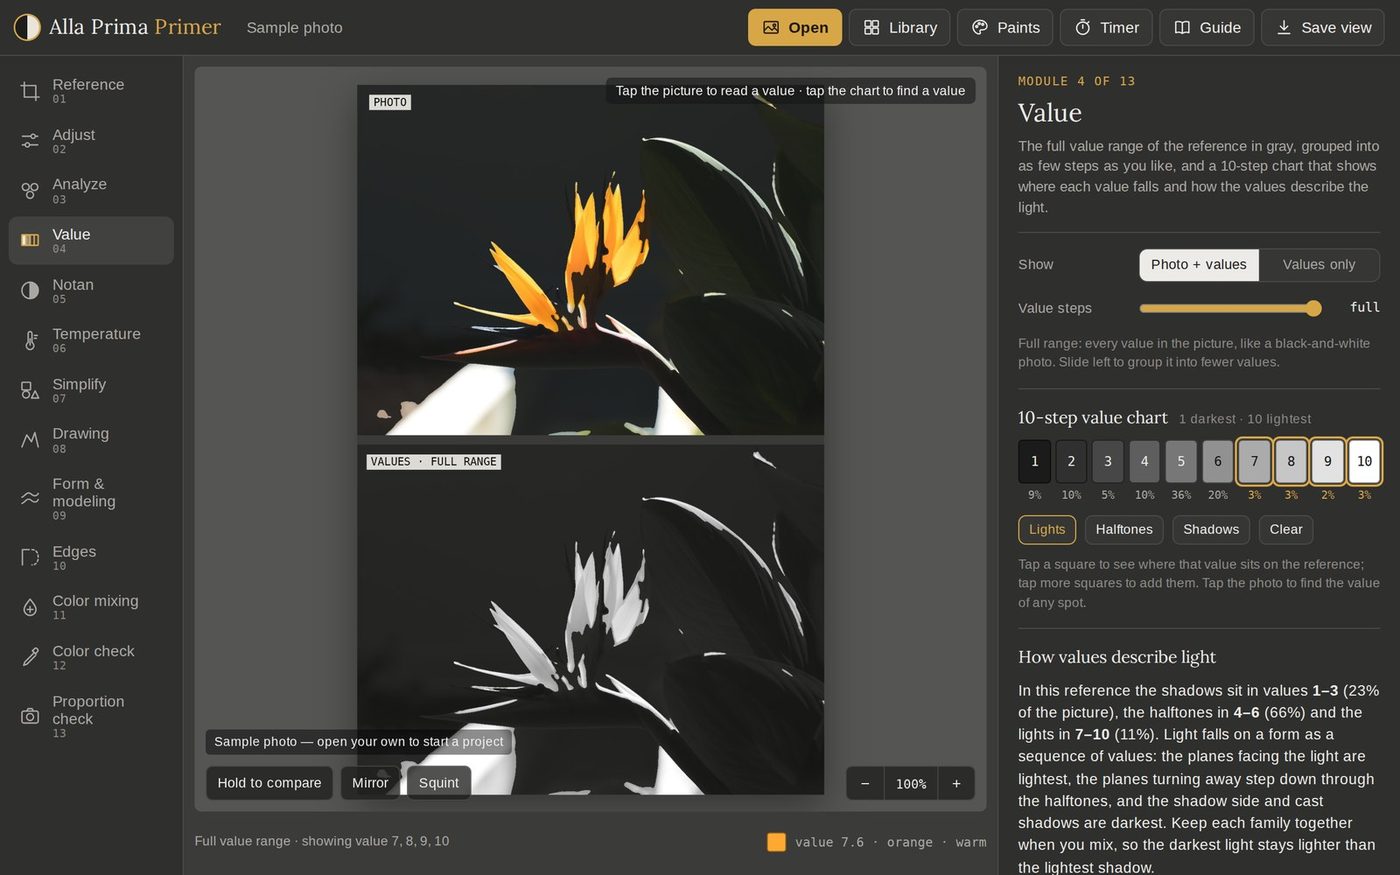
When: after Adjust, before Notan. Value carries an alla prima painting: if the values are right, the colors can shift and the picture still reads.
| Show | What you see |
|---|---|
| Photo + values | The photo with the same picture in values underneath, or beside it on a portrait canvas. |
| Values only | The values alone, filling the stage. Hold Hold to compare to flash the photo. |
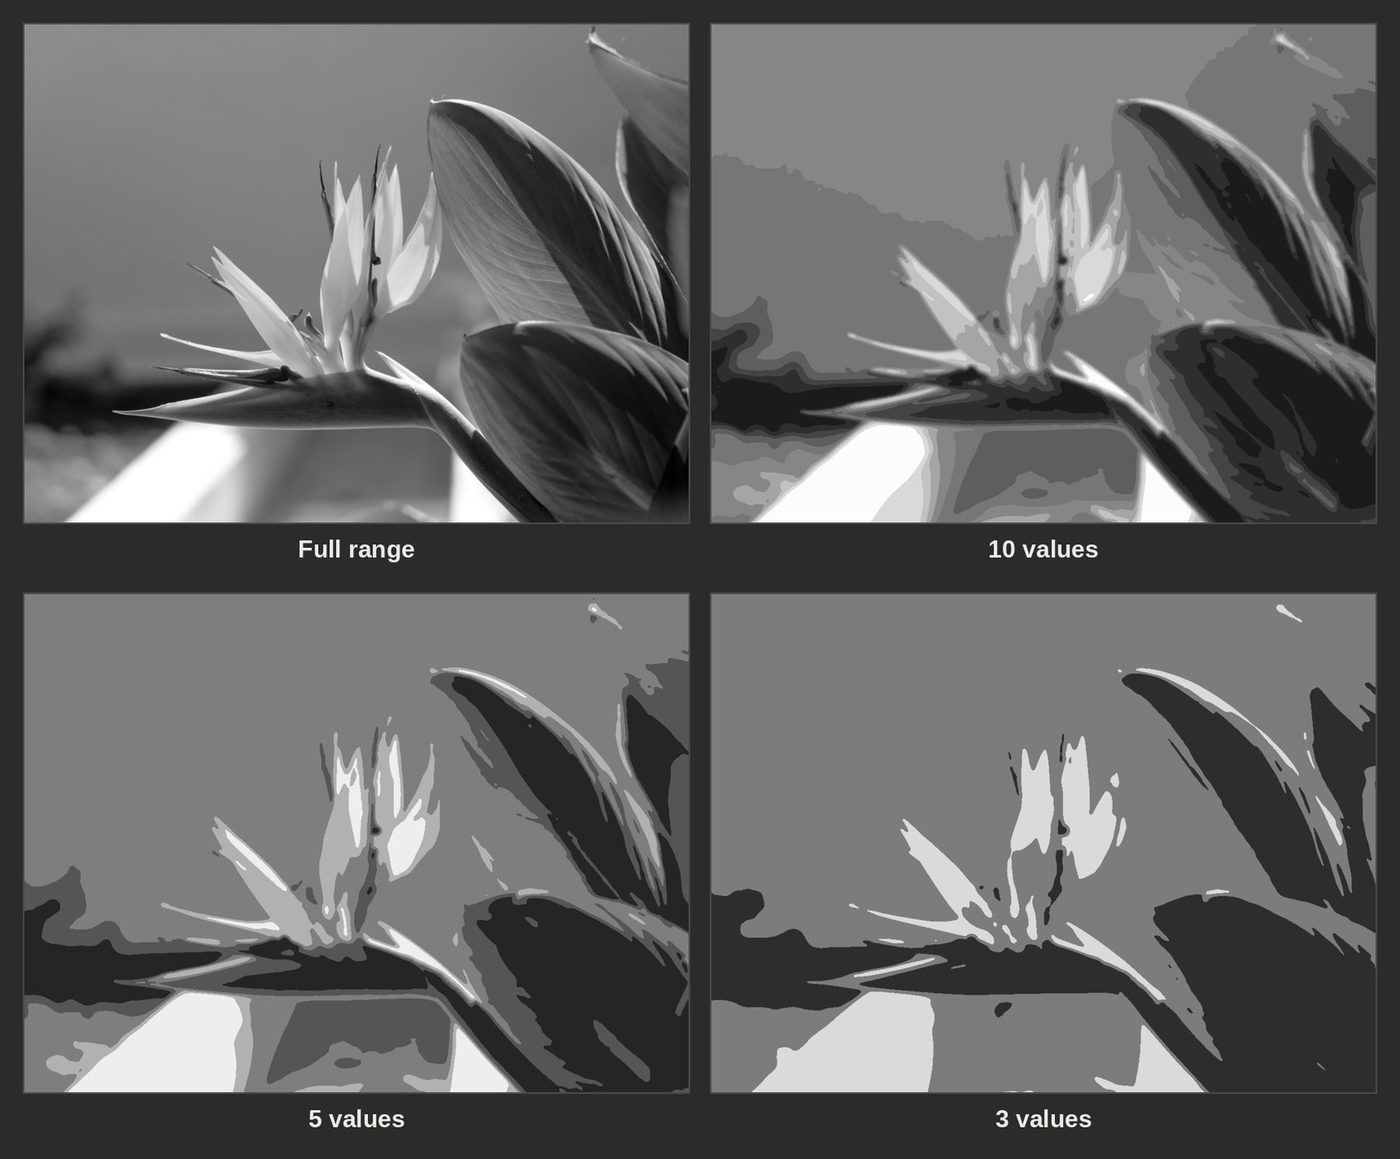
Value steps: the slider runs from 2 steps to full. At full you see every value in the picture, like a black-and-white photo. Slide left to group the picture into fewer values across its own range: few steps give a clear block-in, and more steps show how the forms turn.
10-step value chart: ten gray squares from 1 (darkest) to 10 (lightest), each marked with its share of the picture.
Tap a square to see where that value sits: everything else on the stage darkens. Tap more squares to add them, and tap a lit square again to remove it.
Lights, Halftones and Shadows pick every square in that value family of this picture at once. Clear shows the whole picture again.
Tap the photo to read the value of any spot. Its square lights up on the chart.
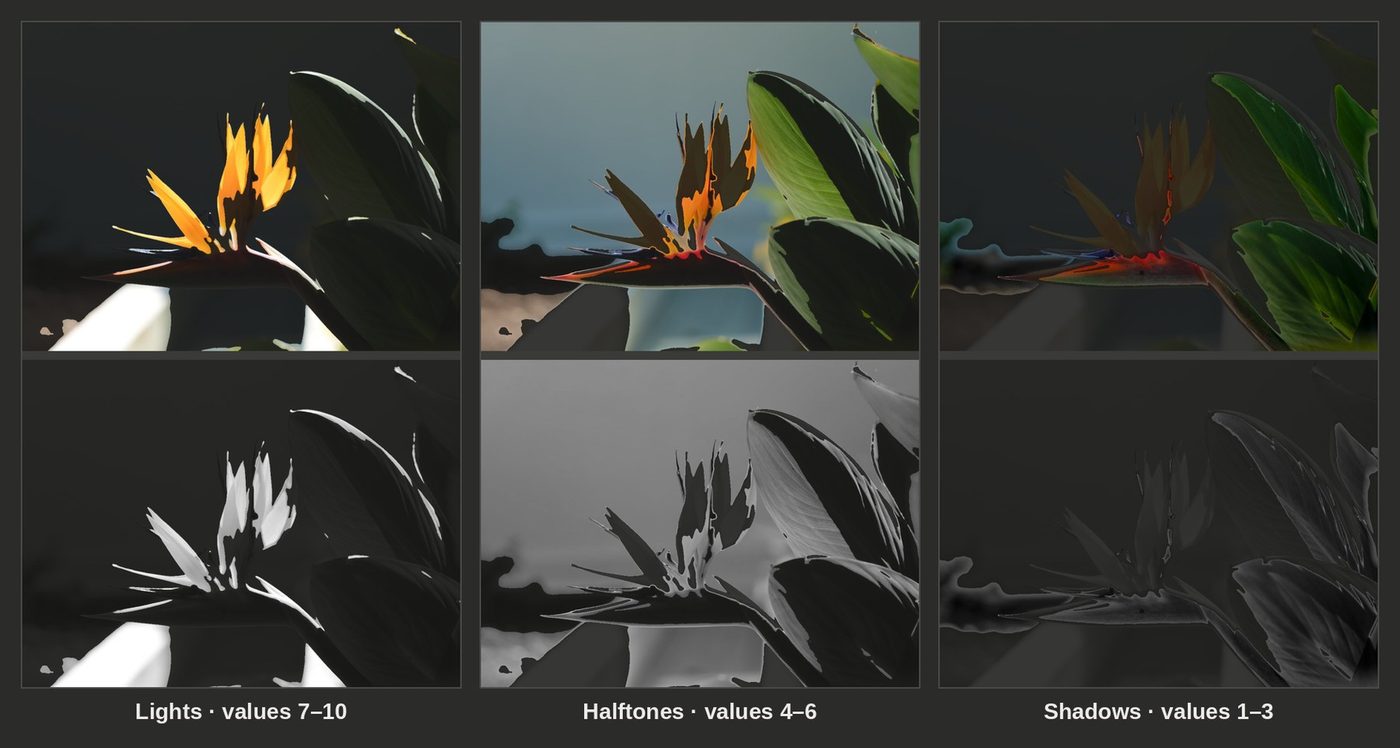
How values describe light: the panel names where each family sits in your reference. For the sample, the shadows are in values 1–3 (23% of the picture), the halftones in 4–6 (66%) and the lights in 7–10 (11%).
Light falls on a form as a sequence of values. The planes facing the light are lightest, the planes turning away step down through the halftones, and the shadow side and cast shadows are darkest. Keep each family together when you mix, so the darkest light stays lighter than the lightest shadow.
Value range: the histogram shows how much of the picture sits at each value. The ochre lines mark where the shadows, halftones and lights divide.
Tips:
Tap Squint (or press S) while you look at Photo + values: small details drop away and the big value masses show.
If the families are hard to tell apart on the chart, the light is flat. Add Contrast in Adjust, or choose a photo with stronger light.
Save the view with Save view and keep it beside the easel as a value map.
5 · Notan
Notan reduces the picture to two, three or five flat values, so you can judge the light-and-shadow design before you think about color.
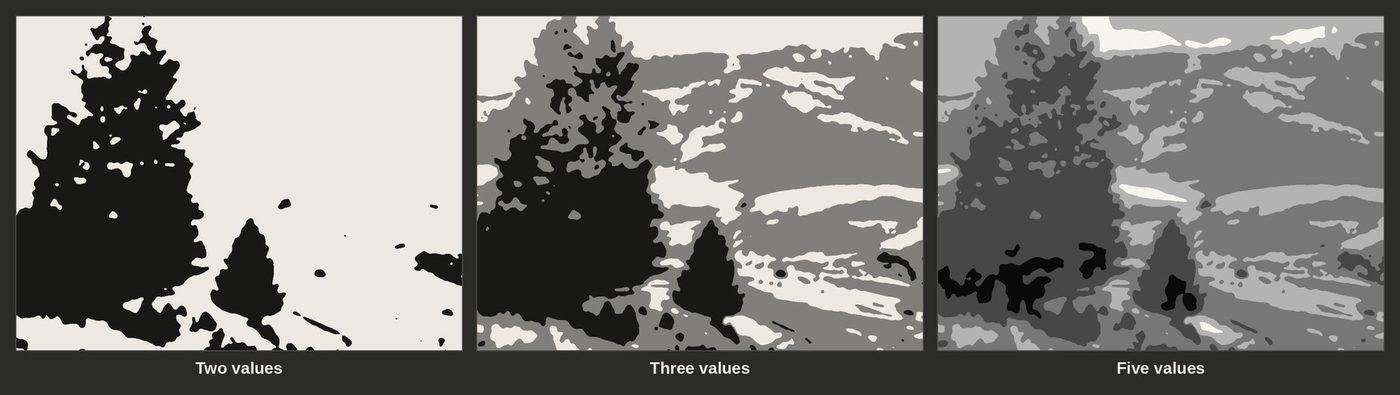
When: after Value and before you draw. If the design doesn't read in two or three values, change the crop or the lighting before you paint. At the easel, use it to decide which value family a passage belongs to.
| Values | Use it for |
|---|---|
| Two | The big design: light shapes against shadow shapes. |
| Three | Planning the block-in as darks, middle values and lights. |
| Five | The full value plan. 1 (black) and 5 (white) are reserved for small accents, 3 is middle gray (about Munsell 5), and the picture is built in 2, 3 and 4. |
Views: three ways to see the same families.
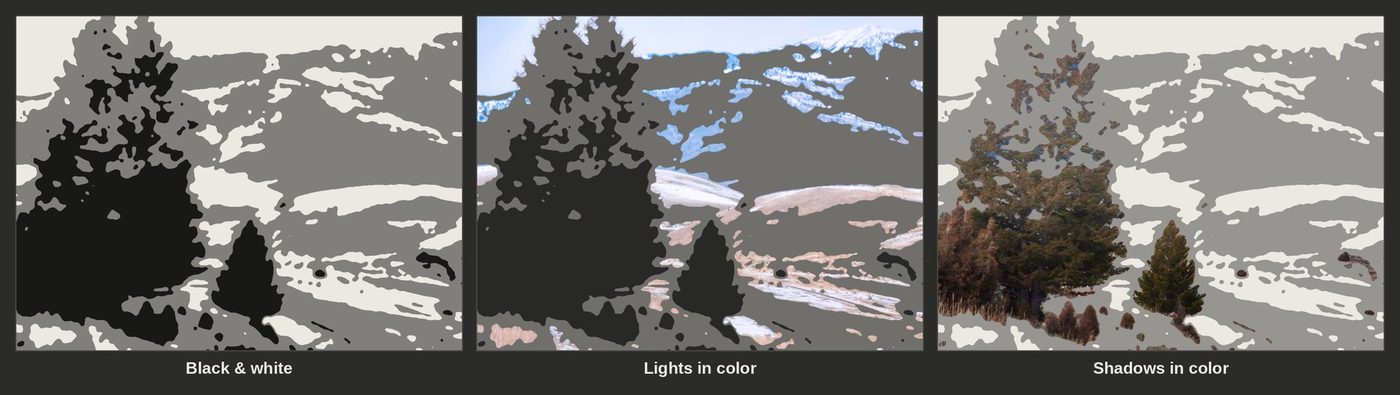
| View | What you see |
|---|---|
| Black & white | Flat grays, the classic notan. |
| Lights in color | The photo's color only where the light falls; everything else flat. |
| Shadows in color | The photo's color only in the shadows, so you can see the color shifts inside them. |
Balance: where the splits fall.
Leave Automatic on to start. It finds the best split for this photo.
To change the design, move a split slider; this switches to manual. Two values have one slider, Light / shadow. Three values have Shadow edge and Light edge. Five values have 2 | 3 split and 3 | 4 split.
With five values, Black accents and White accents set the most of the picture that may be pure black or pure white, from none to 10%.
Split values use the Munsell scale, 0 black to 10 white.
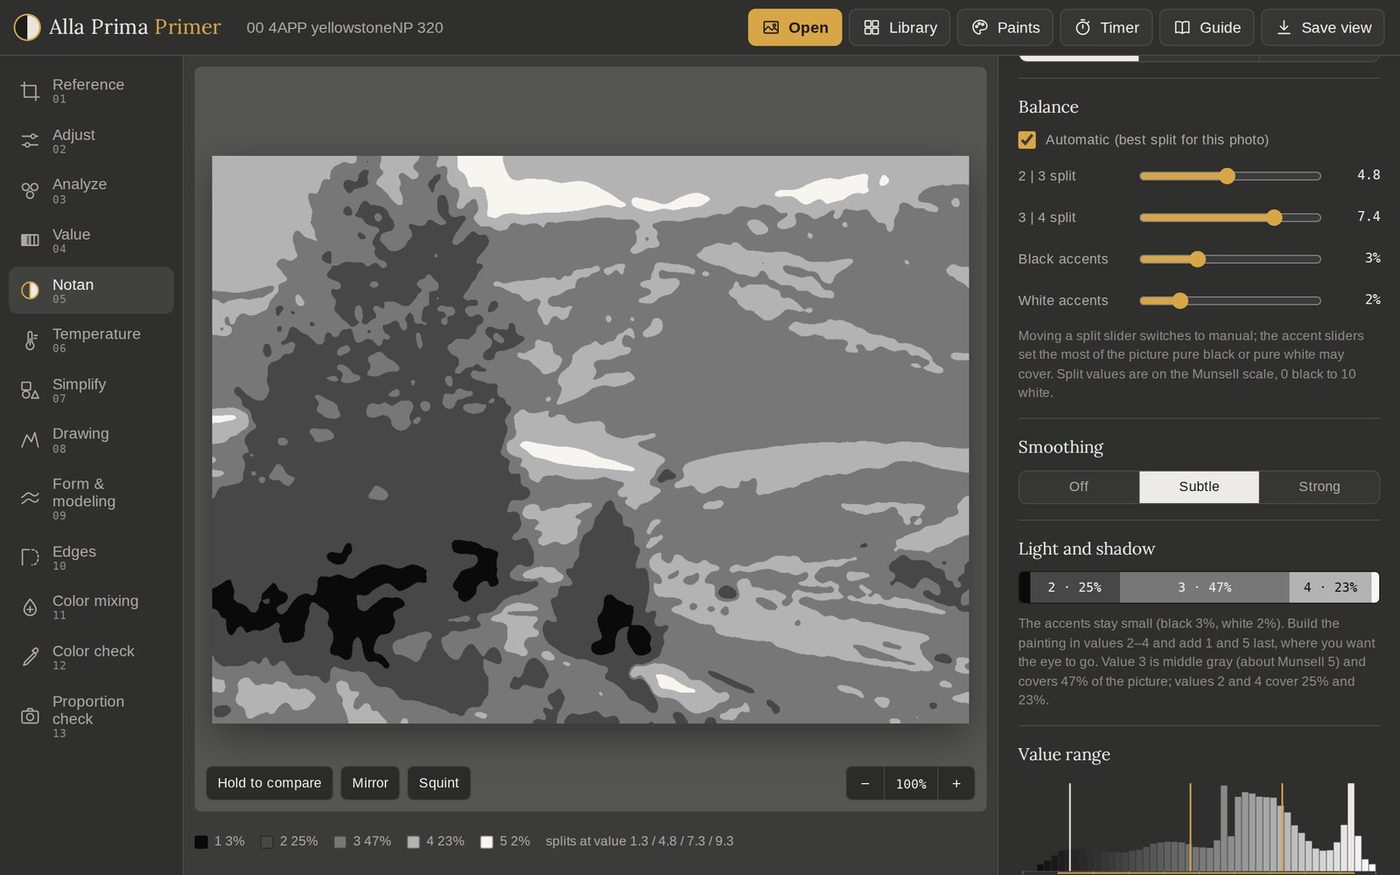
Smoothing: Off shows every speck of the photo, Subtle merges small fragments, and Strong gives big, simple shapes for the first block-in.
Reading the results:
The Light and shadow bar shows each family's share of the picture.
The advice underneath flags weak designs. For the Yellowstone landscape in two values: "Light dominates (69%). A clear, readable design." Light and shadow nearly equal feels static, so shift the balance to about 60/40 or 70/30. With five values it warns when black or white covers too much.
The Value range histogram marks each split; with five values, pale lines show where the accents begin.
Tap anywhere on the image to read its value.
Tips:
If the two-value notan breaks into many small pieces, the design is weak. Crop differently or simplify the light.
Three values make a good first-pass plan: block in the middle family first, then the darks, then the lights.
Five values suit a slower, tonal approach. Keep 1 and 5 for the last few strokes, where you want the eye to go.
Notan is for the design. For the full scale of values, and where each one sits, use Value.
6 · Temperature
Temperature maps where the picture runs warm or cool, and compares the temperature of the lights, midtones and shadows. That relationship is what makes painted light believable.
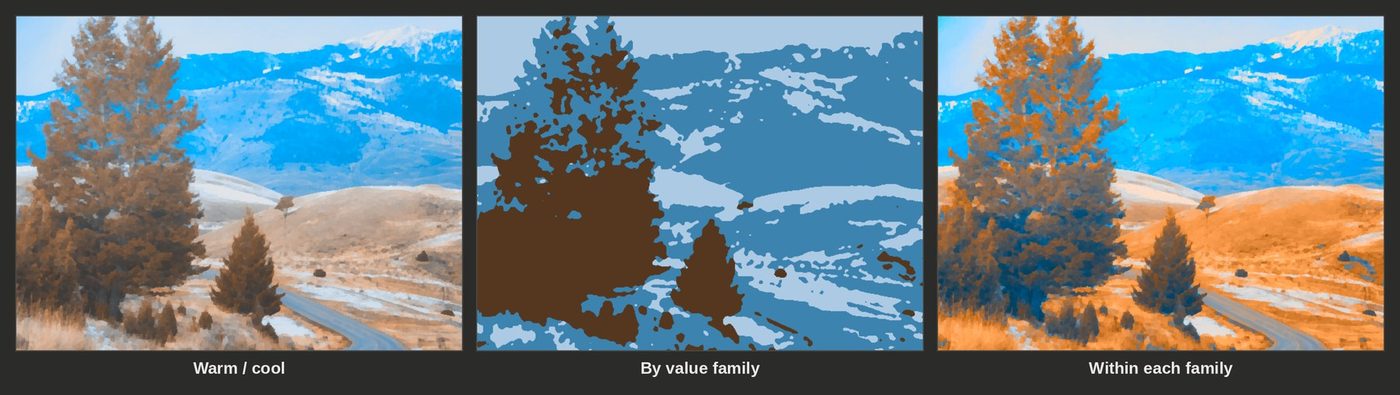
When: after Notan, while you plan mixes and choose a toned ground. At the easel, use Spot check when a passage has the right value but still looks wrong; the temperature is often off.
| View | What you see |
|---|---|
| Warm / cool | Orange is warm, blue is cool and gray is neutral. The stronger the color, the stronger the temperature. Values are kept, so the picture still reads. |
| By value family | Shadows, midtones and lights, each painted in its average temperature: a temperature notan. |
| Within each family | Warmer (orange) or cooler (blue) than the average of its own family. This finds the subtle shifts that turn a form, such as a cool plane in the lights or warm reflected light in a shadow. |
The All, Shadows, Midtones, Lights buttons show one family in color and gray out the rest. Strength exaggerates the display from subtle to strongest; it doesn't change the analysis.
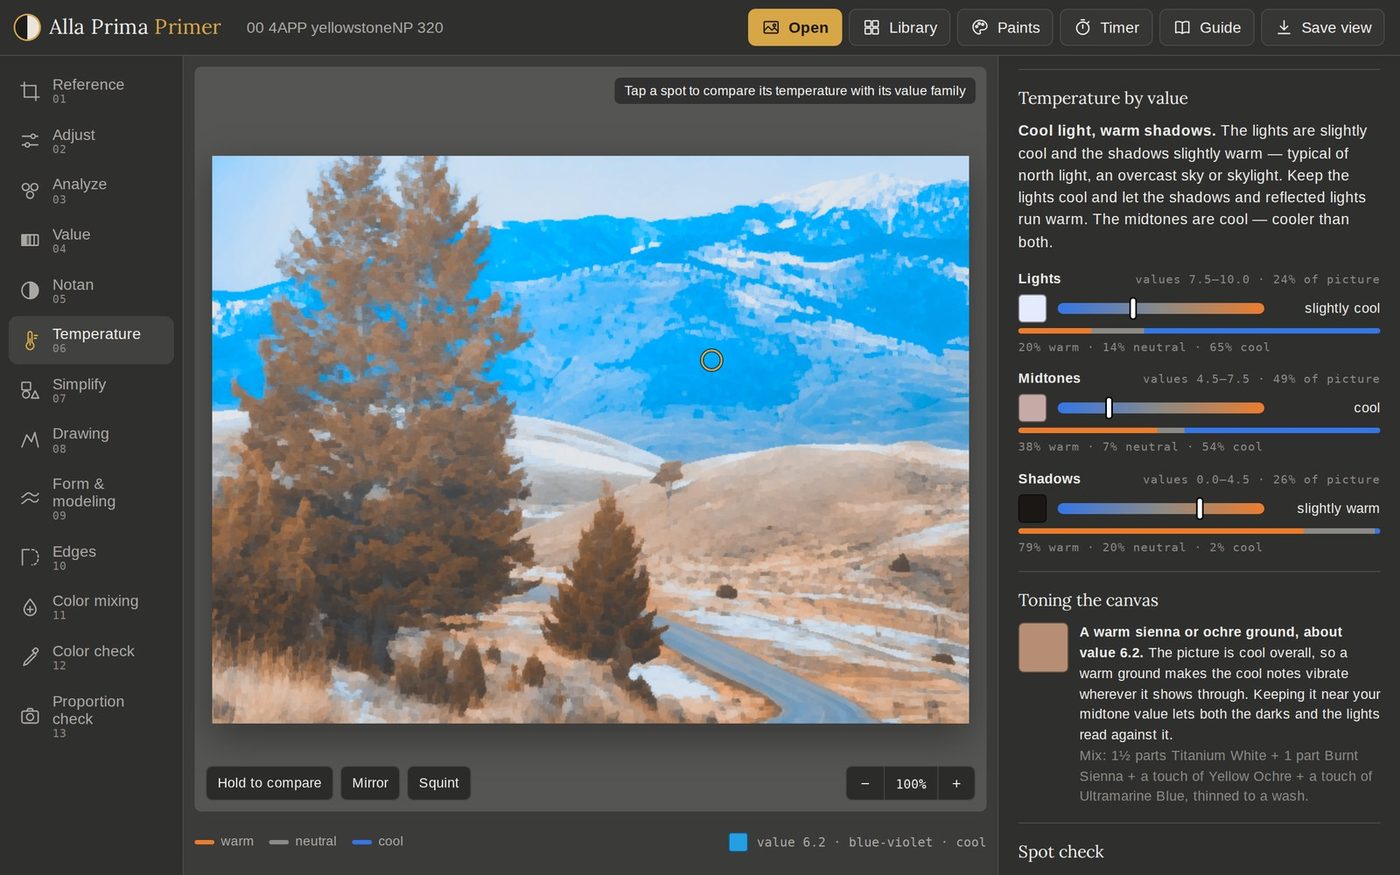
Temperature by value names the pattern and what to do about it:
Warm light, cool shadows is typical of sunlight or a warm lamp. Keep every shadow mix cooler than the light beside it.
Cool light, warm shadows is typical of north light, an overcast sky or skylight. Keep the lights cool and let shadows and reflected lights run warm. The Yellowstone landscape reads this way.
Light and shadow share a temperature means the interest comes from local color and value. Push a little temperature contrast if you want more sense of light.
Below the summary, each family shows its value range, its share of the picture, its most common color, a warm-to-cool bar and its split of warm, neutral and cool.
Toning the canvas suggests a ground near your midtone value, with a recipe to thin into a wash. A warm picture gets a cool blue-gray ground so the warm notes glow where it shows through; a cool picture gets a warm sienna or ochre; a balanced one gets a warm neutral. For the cool Yellowstone landscape, it suggests a warm sienna or ochre ground at about value 6.2.
Spot check: tap any spot. The note tells you its family, its value and whether it's warmer or cooler than the rest of that family, such as "This spot is in the midtones (value 6.2) and reads cool — cooler than the average of the midtones."
Tips:
Phone cameras often neutralize temperature with automatic white balance. Correct it in Adjust, and when you paint from life, trust what you see over the photo.
Use Within each family to find places to vary temperature while keeping the value: reflected light, the cool top plane of a form, the warm core of a shadow.
The summary notes when the midtones are warmer, or cooler, than both the lights and the shadows. Then the turning planes carry the most color, so mix the halftones as their own notes rather than blending light into shadow.
7 · Simplify
Simplify turns the reference into flat shapes you can block in, then splits them into three layers, each painted with its own brush and its own thickness of paint.
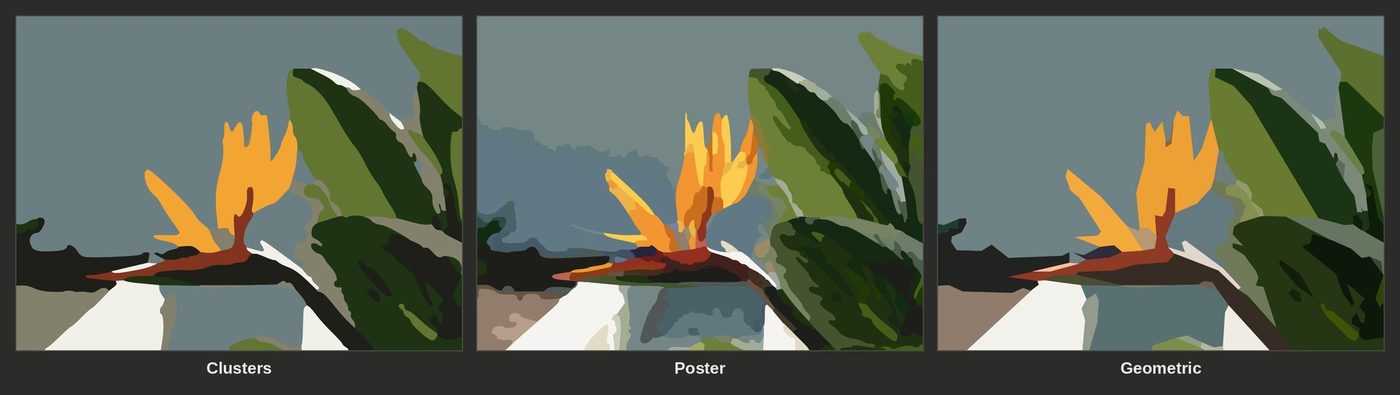
When: while planning the block-in, then at the easel through the session: layer 1 guides the block-in of the masses, layer 2 the modeling of the forms and layer 3 the details.
| Style | What it does | Good for |
|---|---|---|
| Clusters | Snaps every area to one of a few key colors, with smooth edges, like a flat illustration. The most faithful simplification. | A color map of the whole picture, painted shape by shape. |
| Poster | Bold value steps crossed with hue families, like a screen print. | Strong value grouping and design. |
| Geometric | Every shape reduced to a straight-sided polygon. | An angular, constructive block-in. |
Look: how the shapes are painted.
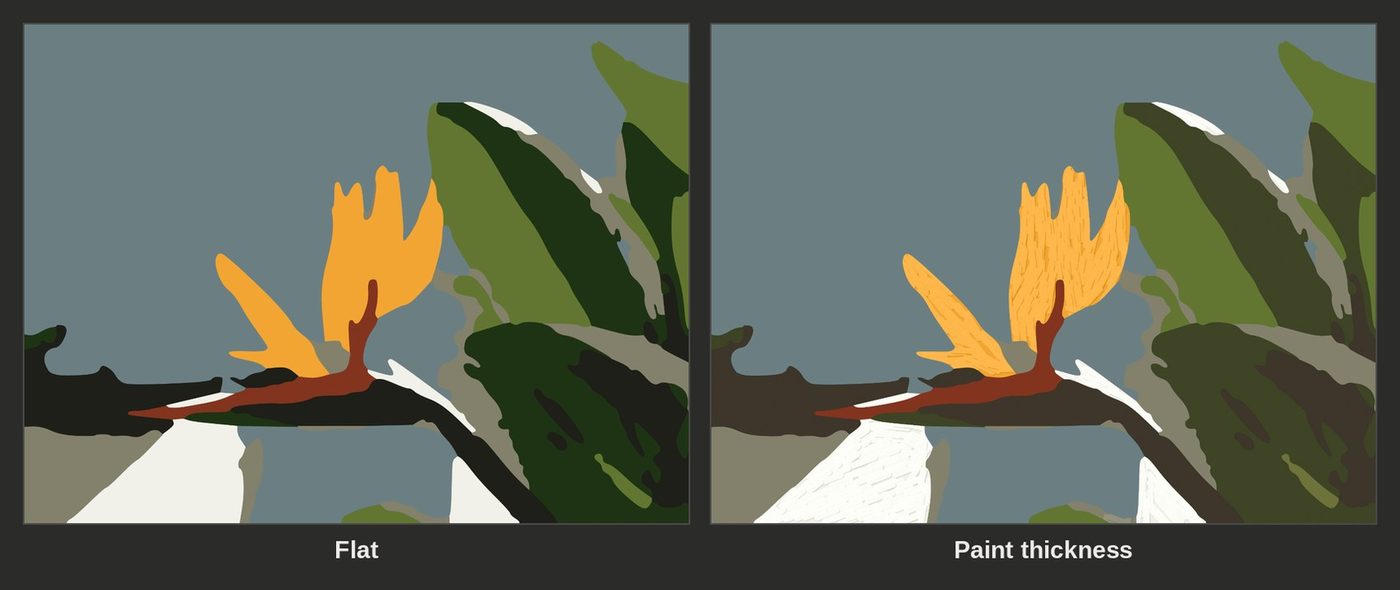
| Look | What you see |
|---|---|
| Flat | Clean, flat shapes, so you read the design before you think about paint. |
| Paint thickness | Thin, transparent paint in the shadows, opaque paint in the midtones, and thick paint in the lights, thickest on the highlights. |
Paint in layers:
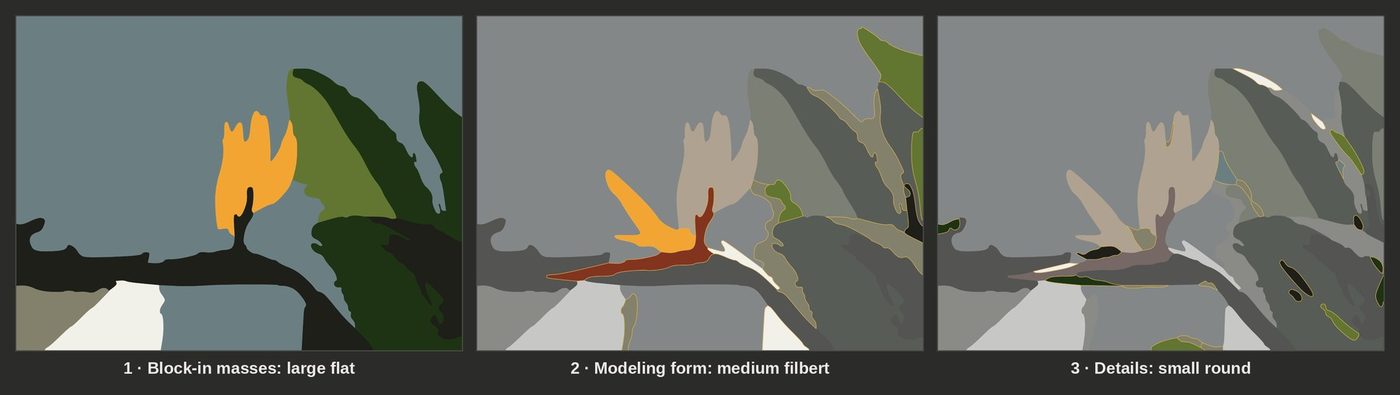
All shows every shape and counts them. The sample has 48: 13 to block in the masses, 12 to model the forms and 23 details.
1 · Block-in masses shows only the big shapes. Paint them with a large flat (square) brush, about ⅞ in (2 cm) wide on the sample's 12-inch-wide canvas, in thin, lean paint. Scrub the shadow shapes in with transparent color, and get the value and temperature of every big mass right before any detail.
2 · Modeling form outlines the new shapes and grays out the ones already done. Paint them with a medium filbert, about ⅜ in (1 cm) wide, in opaque paint: the halftones and the local color of each form, laid into the wet block-in where the form turns. The filbert's rounded tip blends one value into the next without a hard ridge. Keep the shadows thin.
3 · Details adds the last shapes with a small round, about ⅛ in (4 mm) wide, in thick, opaque paint for the lights, thickest on the highlights. Place the darkest accents last.
The brush widths scale with the canvas size you choose in Reference. Outline what's new in this layer draws a thin ochre line around the shapes each layer adds. Under the buttons, the layer list repeats each layer's brush and paint; with Paint thickness on, it adds a key: shadows thin and transparent so the toned ground shows through, midtones opaque, and lights thick enough to hold the brushmark.
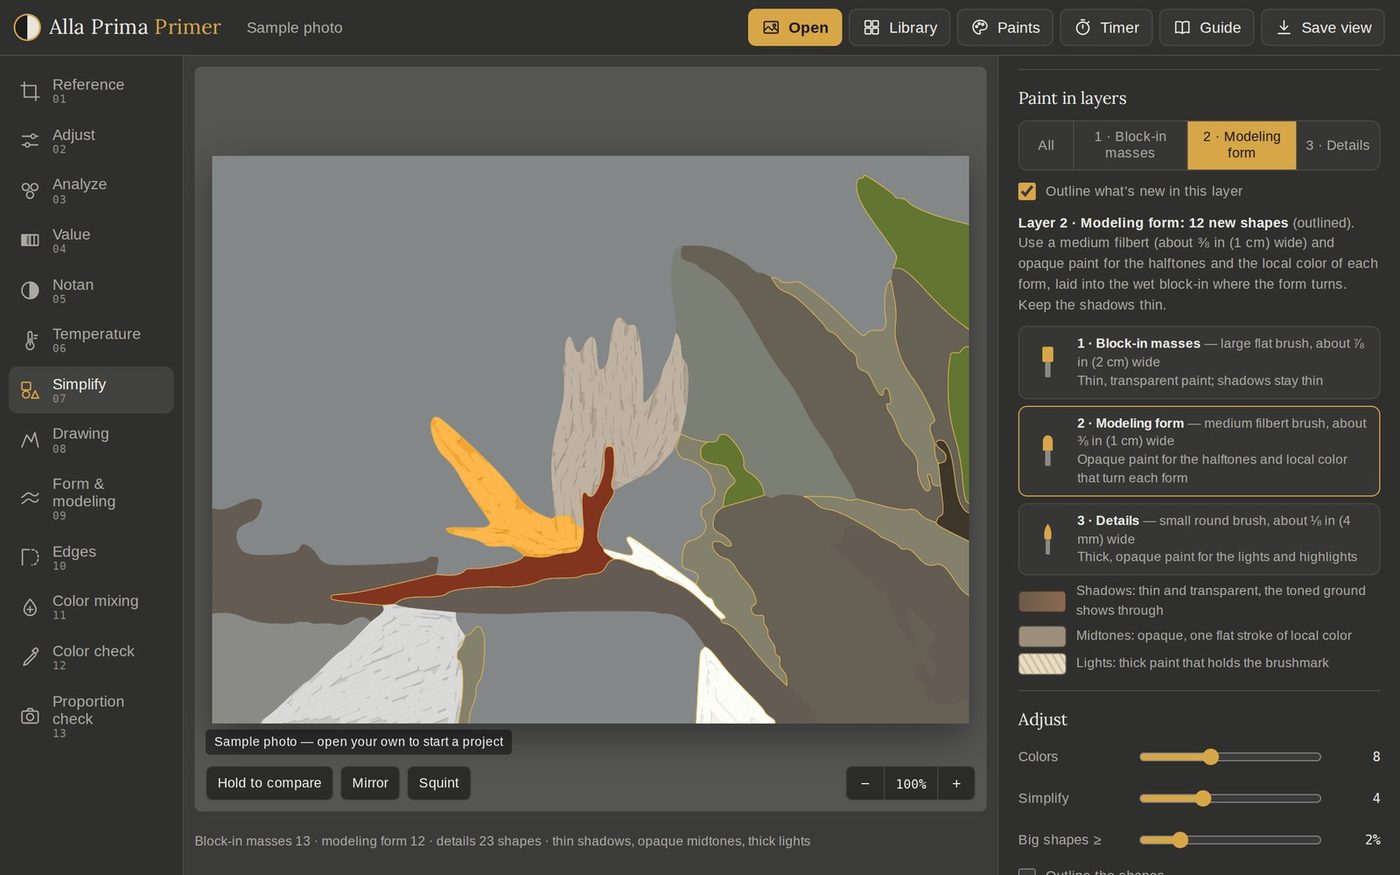
Adjust:
| Control | Effect |
|---|---|
| Colors | How many colors the shapes use, 3 to 16 (not in Poster). |
| Value steps | Poster only: 3 to 8 value steps. |
| Simplify | Merges small shapes. Higher gives fewer, bigger shapes. |
| Big shapes ≥ | The smallest size, as a percentage of the picture, that still counts as a block-in shape. Raise it for fewer layer-1 shapes. |
| Straightness | Geometric only. Higher gives fewer, straighter sides. |
| Outline the shapes | Draws an outline around every shape. |
Colors in this view lists the swatches used, largest first. Tap a swatch or a shape to isolate it, and tap again to show everything. The readout under the stage gives the shape's value, hue and temperature.
Tips:
If layer 1 has too many shapes to block in quickly, raise Big shapes ≥ or Simplify until it reads as a handful of masses.
Keep the darks thin all the way through. Thick dark paint laid early smears into every light stroke you put over it.
Clusters with 5 to 8 colors makes a good color map to keep beside the easel.
For brushwork, open Form & modeling: its Brushwork preview lays the picture down with flat, filbert and round brushes, in the same three passes as these layers.
Time the layers with the Timer: the block-in in the first fifth of the session.
8 · Drawing
Drawing shows the reference in straight lines or as contour lines, in four stages: the envelope, the masses, the shadow map and the edges. It also has tools that measure angles and positions on your real canvas.
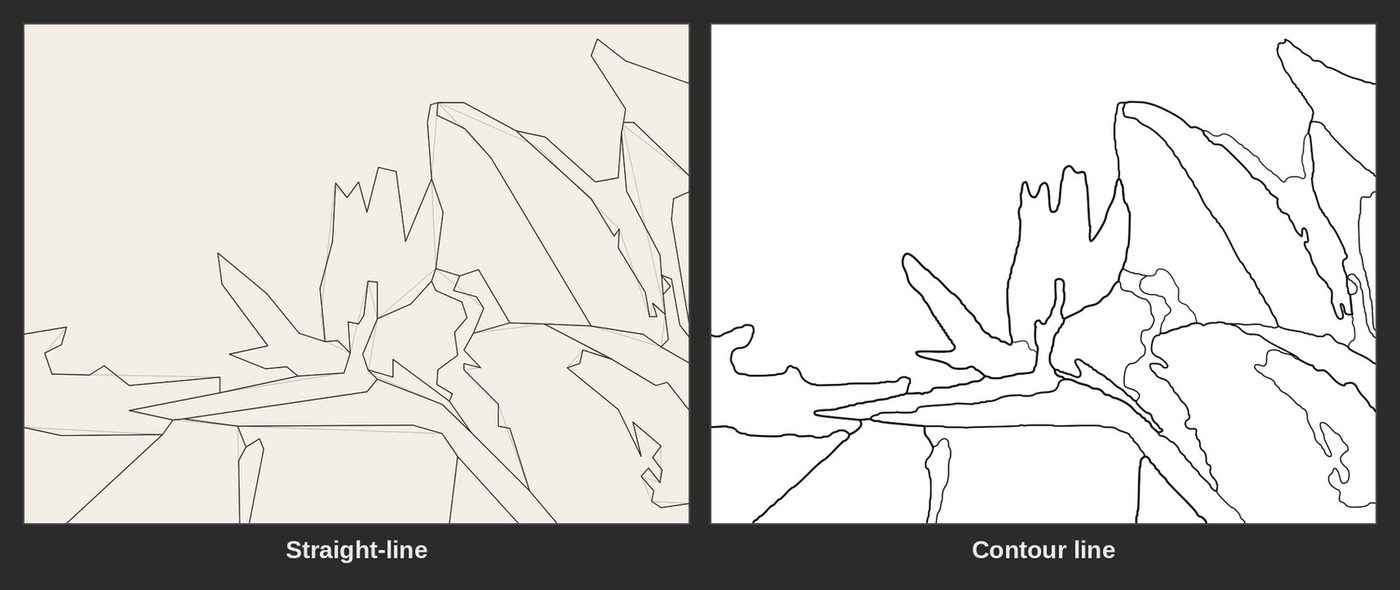
When: as you draw on the canvas, before any paint goes on. Keep the drawing light and simple: in alla prima the paint does the finishing.
| Style | What it shows | Use it for |
|---|---|---|
| Straight-line | Every curve as a few long straight lines, the way you block in with a brush and thinned paint on a toned canvas. Straight lines are easy to measure against a plumb or level line. | Drawing directly with the brush, and placing shapes with correct angles and proportions. |
| Contour line | Clean, continuous contours, with heavier lines on the stronger edges. | Tracing, or printing at canvas size. |
Stages: both styles draw in four stages.
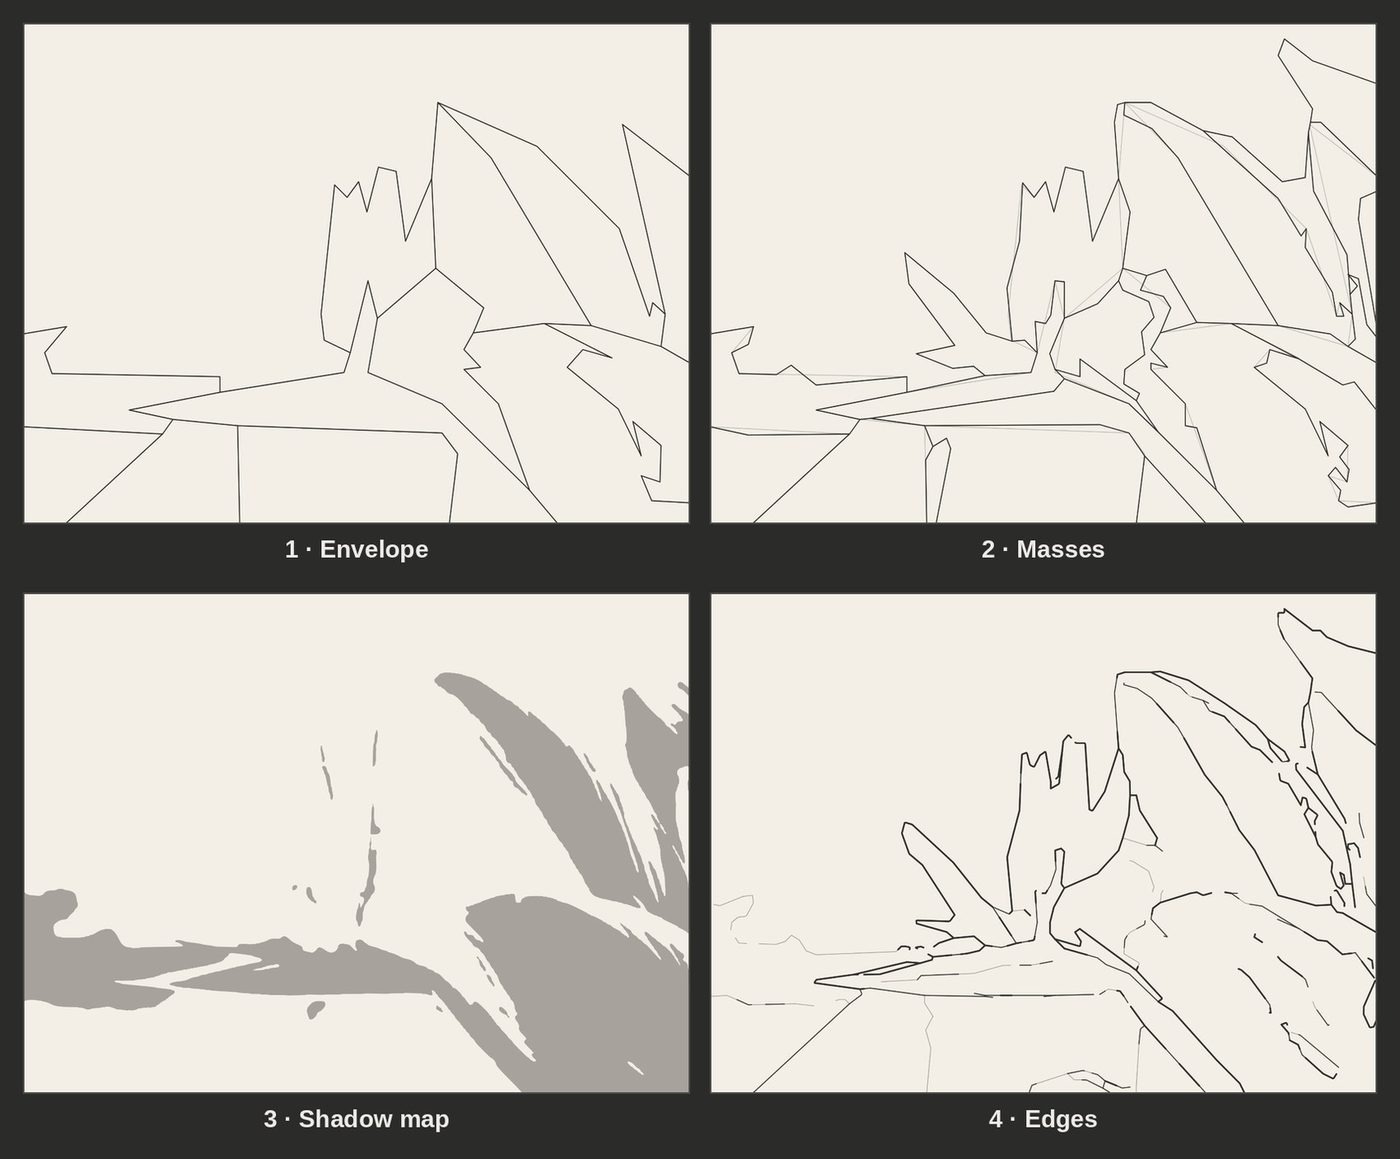
1 · Envelope: the outer shape of each big mass with as few lines as possible. Check its height against its width before you go on.
2 · Masses: the envelope divided into the big masses of light and shadow and the main color shapes. The envelope stays faint underneath.
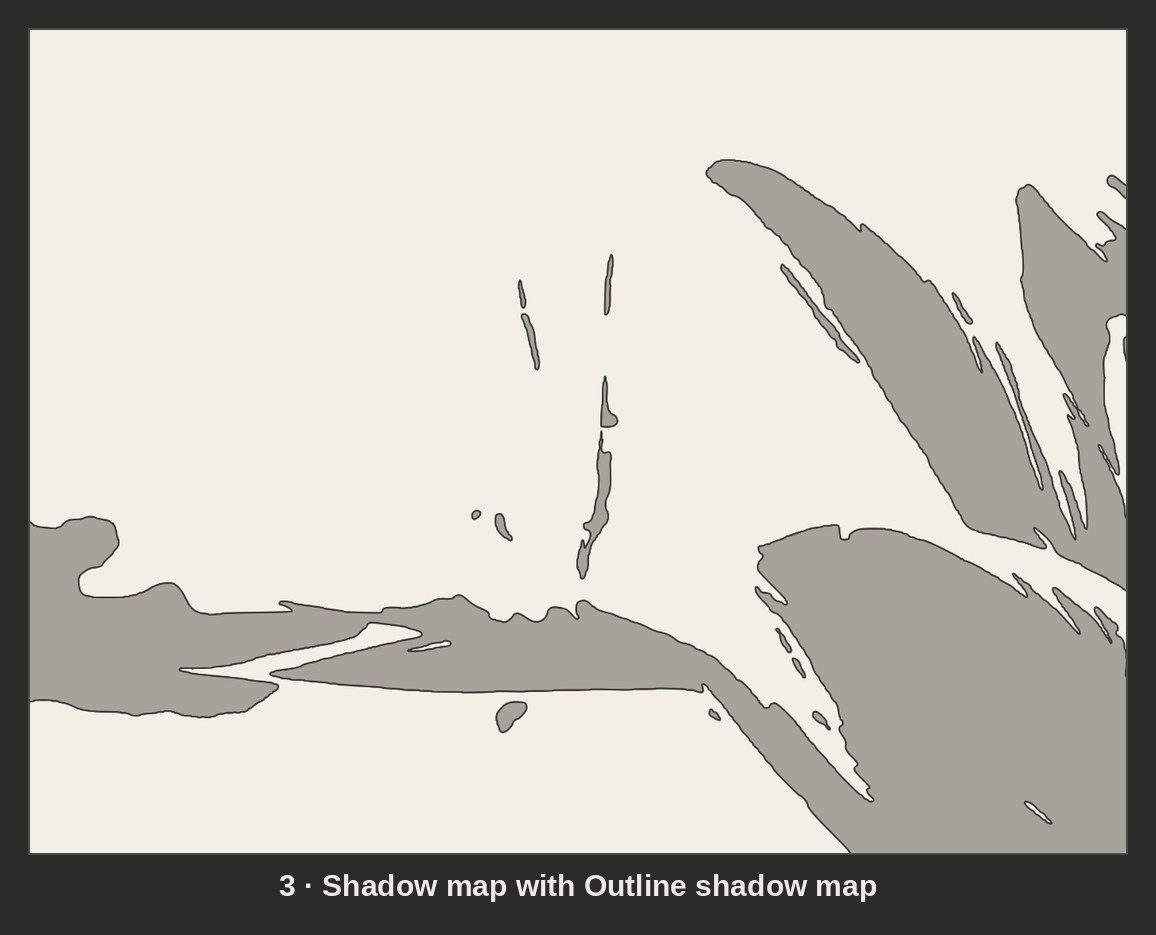
3 · Shadow map: the shadow shapes alone, everything in the dark value family, as one design. They follow the photo closely, with a subtle smoothing that cleans up ragged edges but keeps thin shapes, so you still see the true shape of every shadow. Mass them in with a thin, transparent wash before you paint the lights.
4 · Edges: the finished drawing. The contours are corrected inside each mass; hard edges are firm and dark, soft edges light, and lost edges are left open so shapes can merge.
Outline shadow map appears with stage 3 and traces the edge of every shadow shape. Draw these outlines first with a small brush and thinned paint, then fill the shapes in. Mark measuring points (Straight-line, stages 1, 2 and 4) marks the corners where lines meet, as landmarks to measure between.
Line (Contour line): Follow traces color edges or value edges, Skip short lines drops fragments, and Line weight and Heavier lines on stronger edges set how the lines look.
Photo underneath fades the photo in beneath the drawing, up to 70%. Save PNG saves a large image. Save SVG — prints to size saves a drawing sized to your canvas: print it at 100% and transfer it.
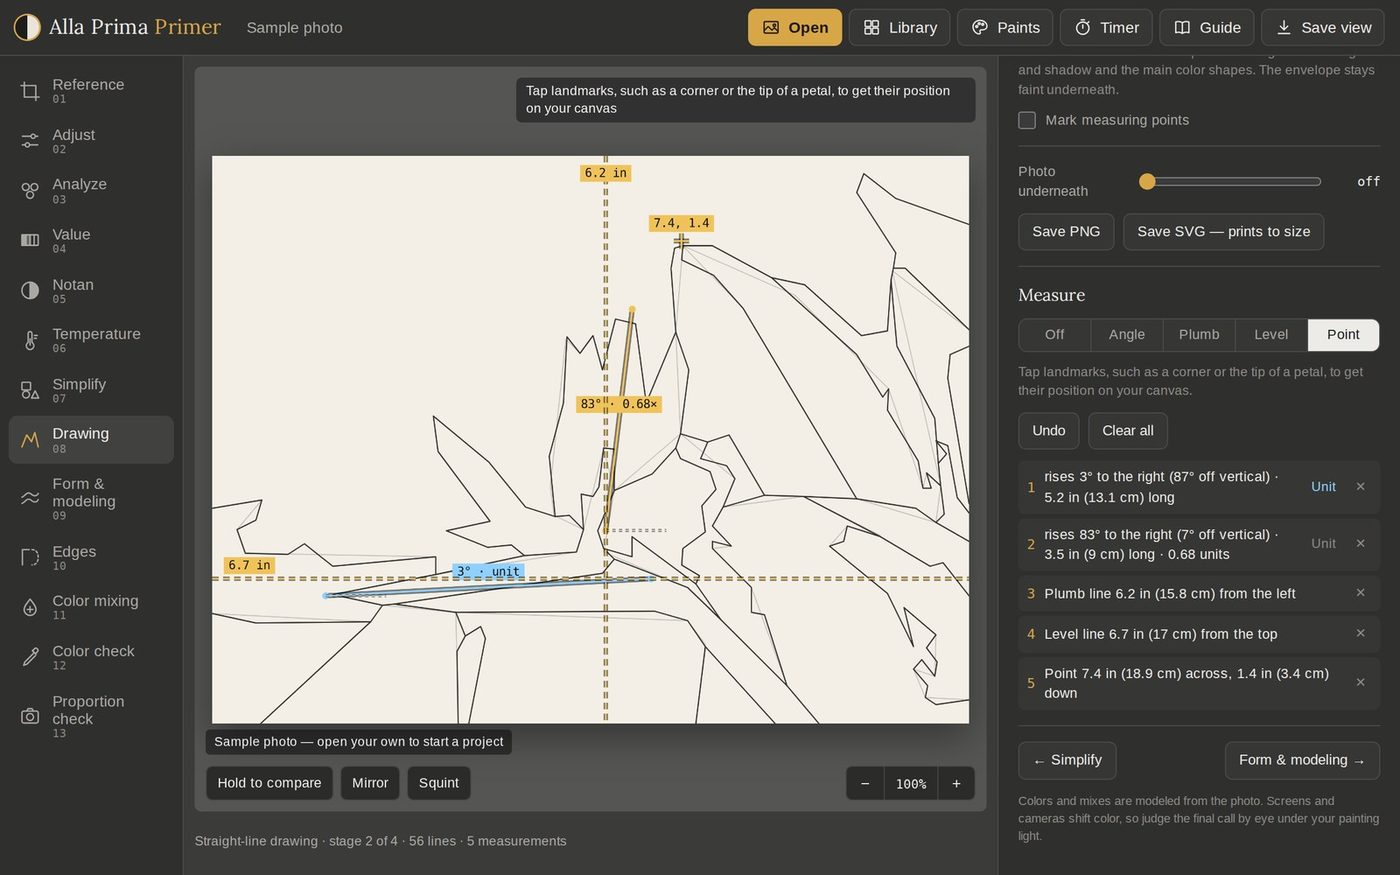
Measure: choose a tool, then draw on the image.
| Tool | How | You get |
|---|---|---|
| Angle | Drag between two points. | The angle, such as "rises 83° to the right (7° off vertical)", and the line's length on your canvas, such as 3.5 in (9 cm). Hold your brush handle at that angle to transfer it. |
| Plumb | Tap. | A vertical line and its distance from the left edge. See what lines up above and below. |
| Level | Tap. | A horizontal line and its distance from the top. Compare heights across the picture. |
| Point | Tap a landmark. | Its position on the canvas, such as "7.4 in (18.9 cm) across, 1.4 in (3.4 cm) down". |
Tap Unit beside any angle line to make it the unit of measure. Every other line then shows its length in units, such as "0.68 units". This is comparative measuring, the painter's way to check proportions: in the sample, the flower stands about two-thirds as tall as its beak is long.
Undo removes the last mark, ✕ removes one, and Clear all starts again. With the tool set to Off, dragging moves around a zoomed picture.
Tips:
Positions in inches and centimeters need a canvas size in Reference. Without one, they're percentages of the picture.
Pick a unit you can see clearly, such as the height of the main object, and compare everything to it.
Draw with a thin wash of a transparent earth color, such as Burnt Sienna. It disappears under the paint.
At stage 3, look for shadow shapes you can link into one bigger shape. Connected shadows make a stronger design and are quicker to mass in.
Tap Mirror now and then; a flipped drawing shows lopsided shapes at once.
9 · Form & modeling
Form & modeling shows how the light models each form in three notes of its own local color, breaks the picture into value planes from flat to volume, and previews the picture painted with flat, filbert and round brushes.
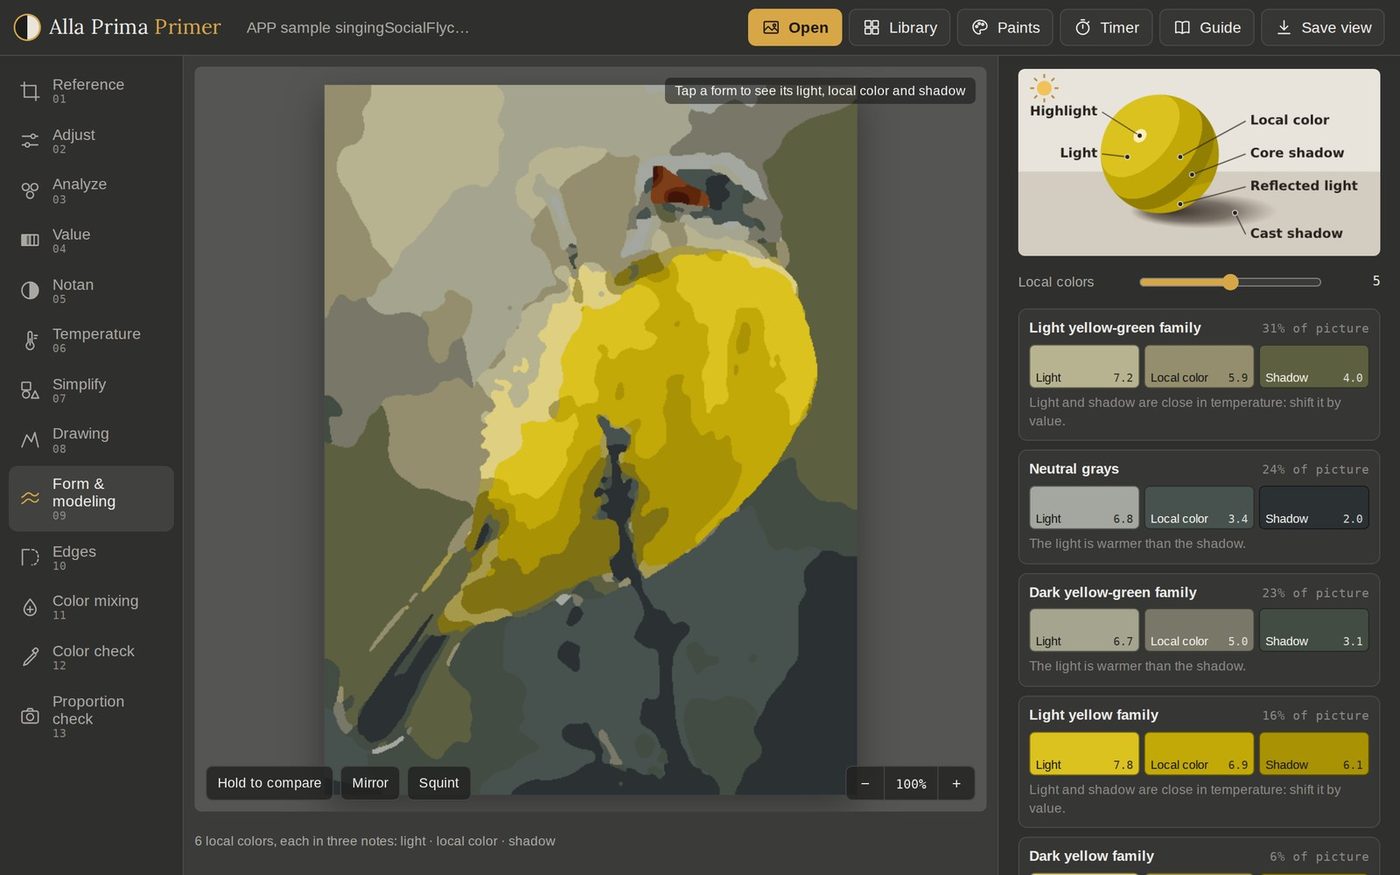
When: after the drawing, before you load the brush. Decide how each form turns from light into shadow, plane by plane, and which brush lays each passage.
Light & shadow: every form turns from light into shadow. This view repaints each local color in three notes of its own: the light, the local color in the halftone, and the shadow. Lay in the shadows first with thin paint, then the local color, then the lights with thicker paint.
The sphere at the top of the panel shows the same turn on a simple form, painted in the reference's main local color:
| On the sphere | Where it is | How to paint it |
|---|---|---|
| Highlight | The small spot that mirrors the light source. | Last, in the thickest paint, in one touch. |
| Light | The planes facing the light. | Thick, opaque paint, lighter than the local color. |
| Local color | The halftone, where the form begins to turn. | Opaque, the object's own color at its strongest. |
| Core shadow | The darkest band, where the form turns away from the light. | Thin paint; it sets the edge between light and shadow. |
| Reflected light | Light bounced back into the shadow side. | Thin, and always darker than any light. |
| Cast shadow | The shadow the form throws, darkest where it touches. | Thin and transparent, with its hardest edge at the contact. |
Local colors (2 to 8) sets how many local colors the view finds.
The list gives each local color's three values and says whether its light is warmer or cooler than its shadow. On the flycatcher, the light yellow family runs from light 7.8 through local color 6.9 to shadow 6.1.
Tap a form on the stage, or a note in the list, to show that local color alone. Its note appears in the readout under the stage.
Value planes: look for the value changes, and treat each one as a flat plane. Slide Flat ↔ volume through eight steps: from two planes up to eight, then a smooth turn.
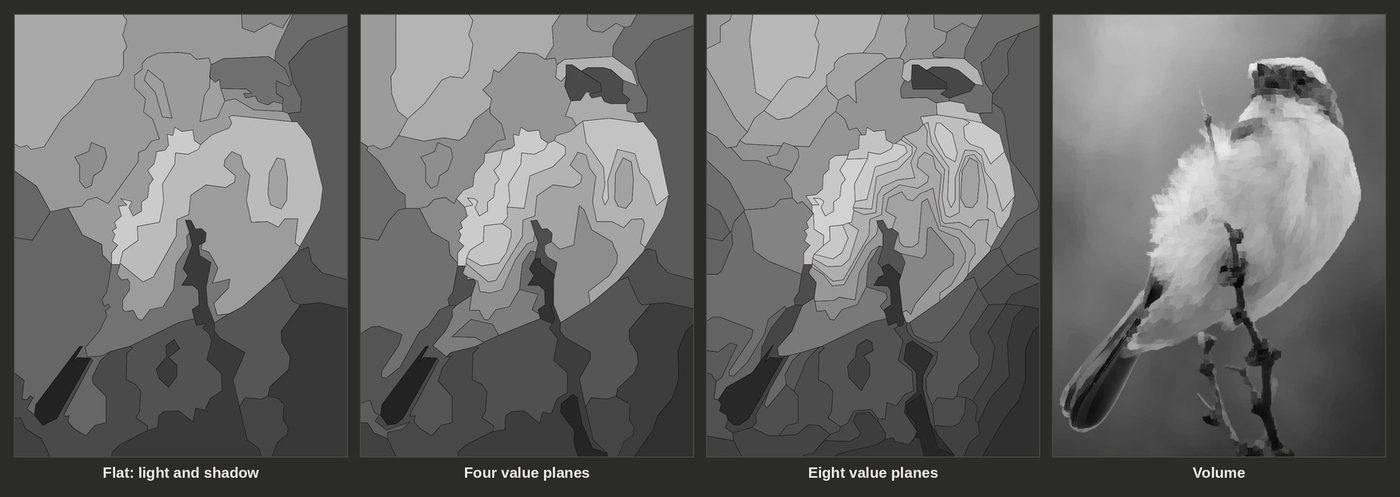
| Setting | What you see |
|---|---|
| Flat | Every form in two planes, light and shadow, like a poster. Get this right first; it carries the painting from across the room. |
| 3 planes | The light, one halftone where the form turns, and the shadow. |
| 4 planes | The light, two halftones and the shadow. The plane breaks show where each form turns. |
| 5 planes | The light, three halftones and the shadow. Enough for most forms in a one-session painting. |
| 6 planes | A finer turn, like facets cut into a gem. Lay each plane as one stroke of one mixture. |
| 7 planes | The halftones begin to read as a gradation. Save this many for the focal point, where a form turns slowly. |
| 8 planes | Close to a smooth turn. Few alla prima paintings need this many; study how the values change, then paint fewer, bigger planes. |
| Volume | The planes melt into a smooth turn. Paint the planes first, then soften the breaks where the form is round and keep them where it is angular. |
The planes show in grays, by value. Planes in color fills each plane with its own average color instead, ready to mix.
Show plane breaks outlines where one plane turns into the next, except at Volume.
Each plane is one mixture: premix a pile for each, value first, and lay every plane with as few strokes as you can.
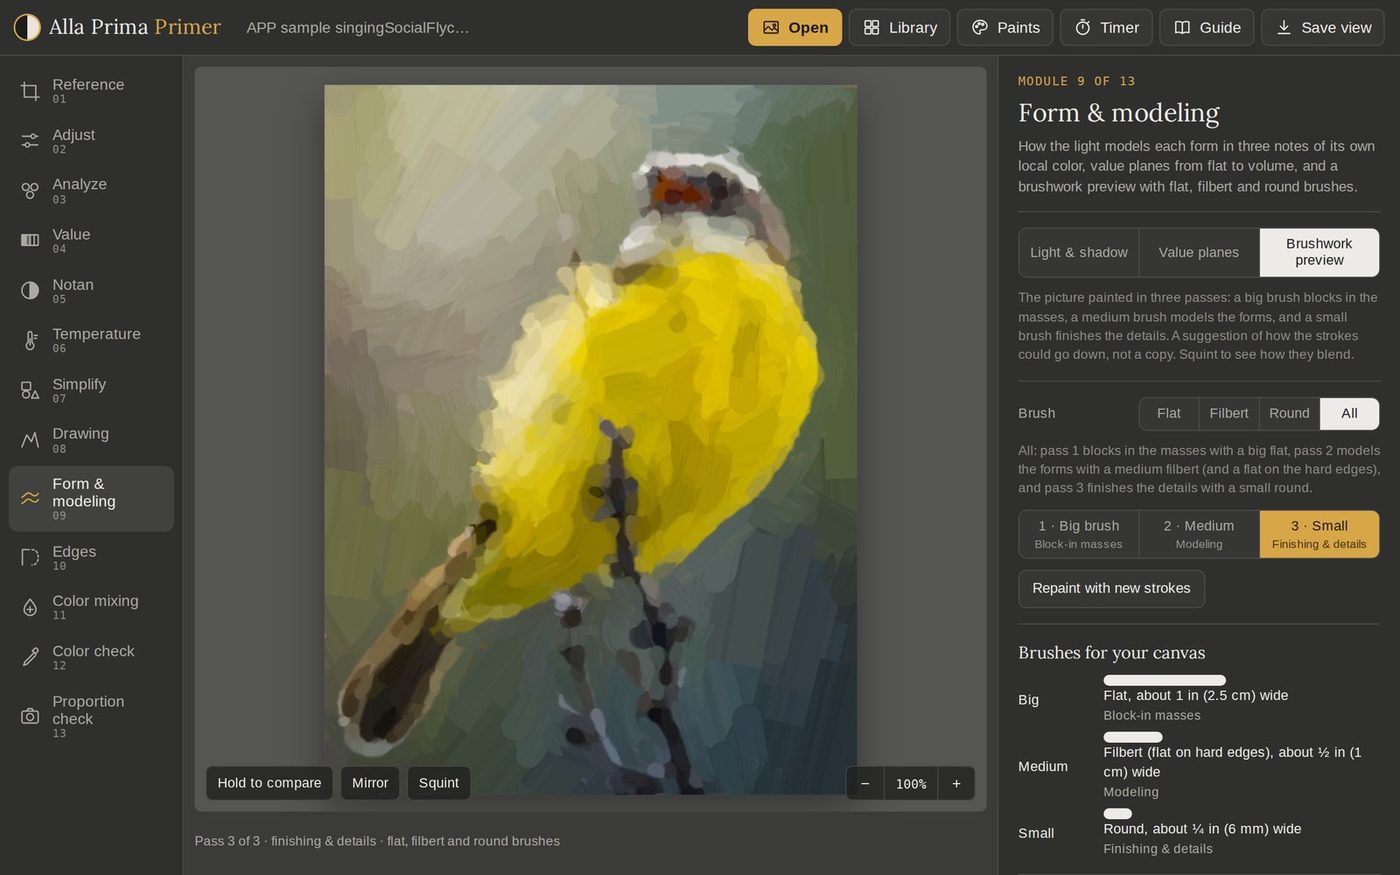
Brushwork preview: the picture painted in three passes: 1 · Big brush blocks in the masses, 2 · Medium models the forms, and 3 · Small does the finishing and details. It's a suggestion of how the strokes could go down, not a copy. Repaint with new strokes lays them down again.
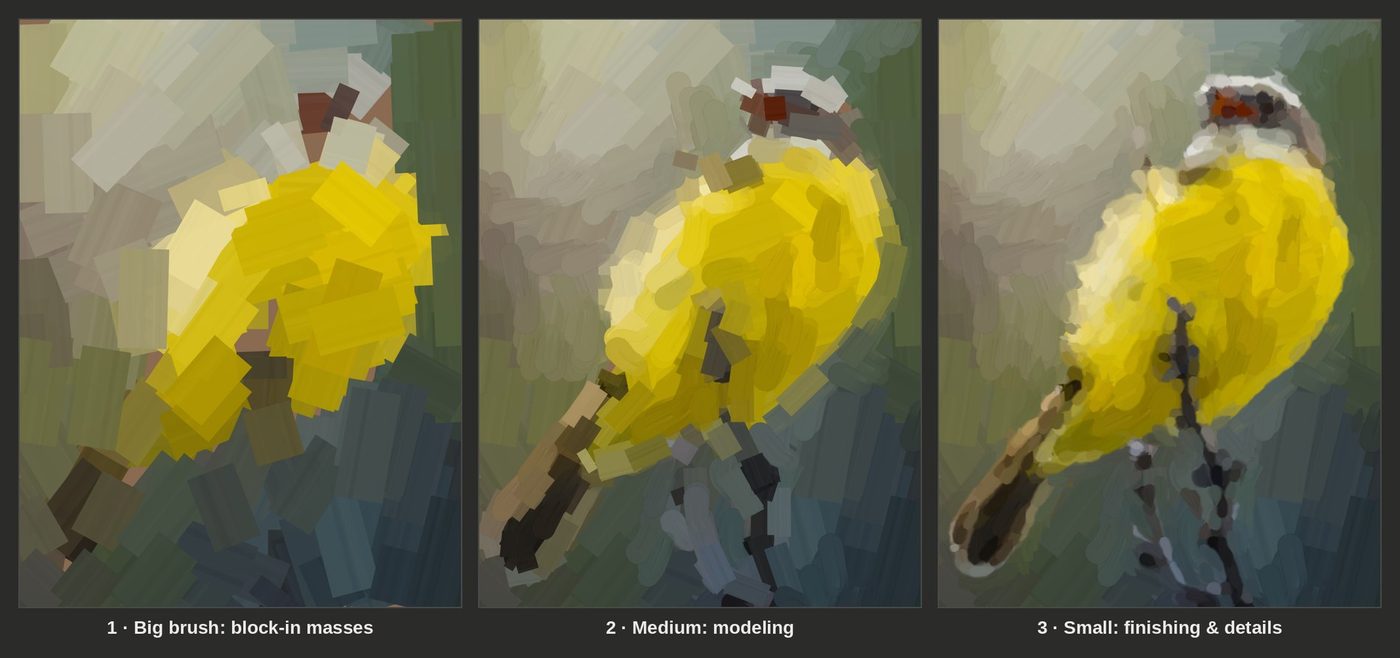
Brush chooses the brush for every pass:
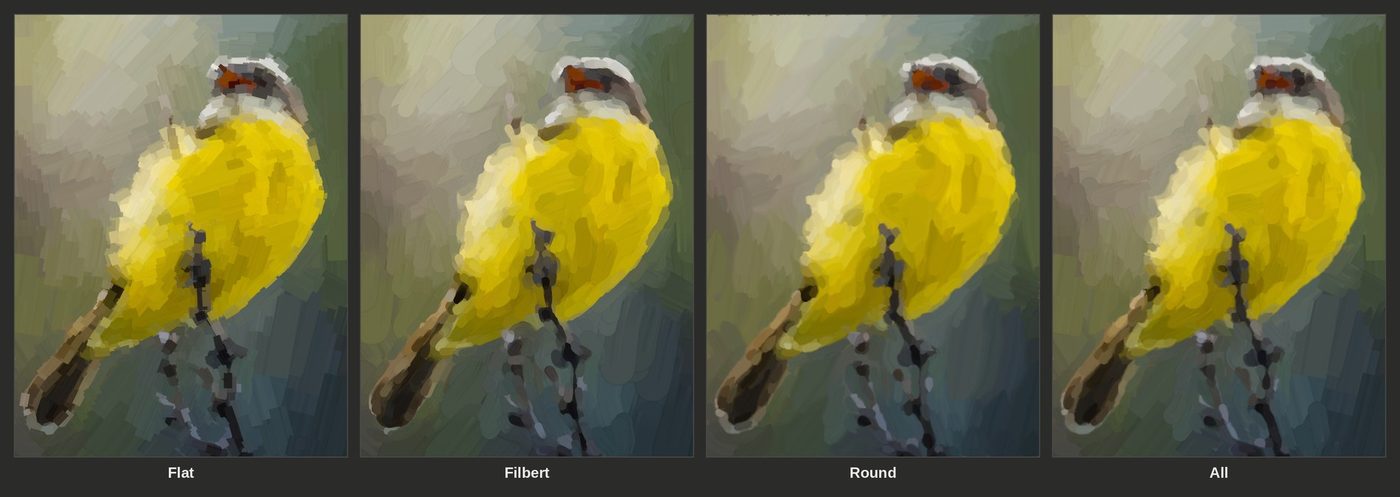
| Brush | Strokes | Use it for |
|---|---|---|
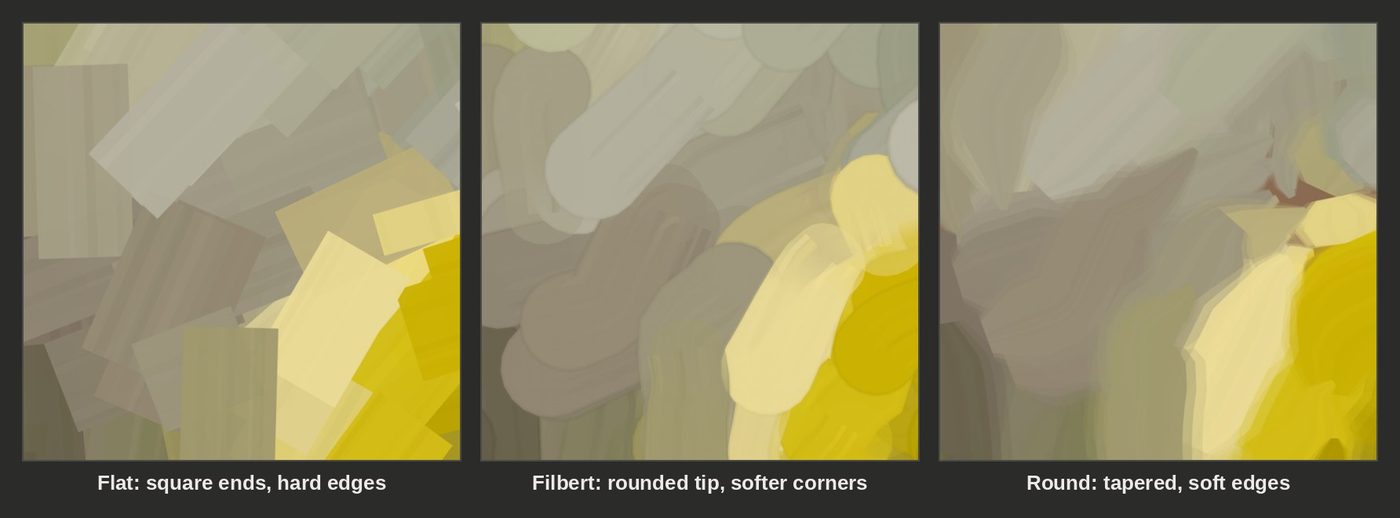
| Flat | Straight strokes with square ends and hard edges. Inside a plane they lie along the plane; on an edge they cut along it. | Blocking in the masses, laying the planes and crisp edges. |
| Filbert | A flat brush with an oval tip: broad strokes with a rounded start, softer corners and a streaky end where the brush lifts. They wrap around the form. | Modeling the turn of a form and blending one plane into the next. |
| Round | Curving strokes that taper to a point as the brush lifts, with soft, feathered edges. | Soft turns, lines and details. |
| All | A big flat blocks in the masses, a medium filbert models the forms (with a flat on the hard edges), and a small round finishes the details. | Most alla prima paintings: the usual order of brushes, from big to small. |
Brushes for your canvas gives each pass's brush, width and job. On the flycatcher's 9 × 12 in (23 × 30 cm) portrait canvas, with All: a flat about 1 in (2.5 cm) to block in the masses, a filbert about ½ in (1 cm) to model the forms, with a flat on the hard edges, and a round about ¼ in (6 mm) for the finishing and details.
Light direction estimates where the light comes from, such as "the upper left". Keep the planes facing it in the light family.
Tips:
Model with value first. If a form's three notes are right in value, it turns even when the color is off.
Treat pass 1 as the target for your block-in. If your canvas looks like pass 1 after the first layer, you're on track.
Keep a flat for planes and crisp edges, a filbert to turn the form, and a round for soft touches and details. Changing brushes is quicker, and cleaner, than blending wet paint.
Keep one brush for the shadows and another for the lights, or wipe the brush between them, so dark paint never dirties a light.
Tap Squint on the Brushwork preview, then squint at your canvas: from a distance the strokes blend, and both should read as the same big masses.
Planes and light direction come from the photo's values, not from recognizing objects, so a plane can spill into a background of the same value. Check against the photo.
10 · Edges
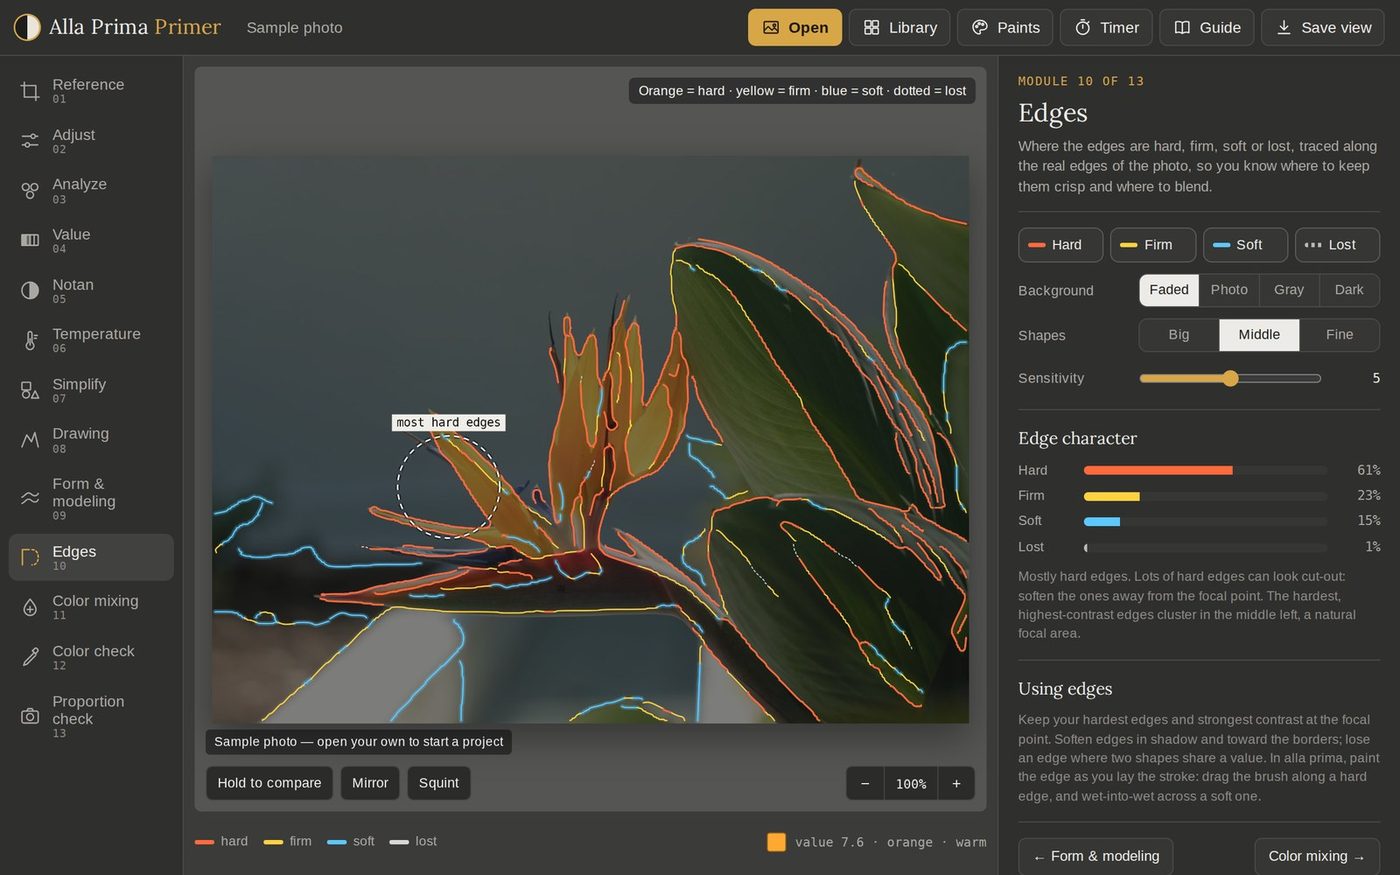
Edges traces the real edges of the photo and colors each one hard, firm, soft or lost, then circles the area where the hardest edges cluster: a natural focal point.
When: before you paint, to plan where edges stay crisp. Come back in the refining stage, the last third of the session, to decide where to soften or lose them.
| Line on the image | Edge | How to paint it |
|---|---|---|
| Orange-red | Hard | A crisp break in value or color. Lay the stroke along the edge, or cut in with the next shape. |
| Yellow | Firm | Clear but not sharp. One light pass wet-into-wet. |
| Blue, with a soft glow | Soft | A gradual turn. Drag the brush across the edge, or blend once with a clean brush. |
| Gray, dotted | Lost | Two shapes of nearly the same value. Paint across them as one shape. |
How it reads the photo: every line follows an edge traced in the photo, where the value or color changes. Each edge is graded by how quickly it changes: a sudden break is hard, a gradual turn is soft, and a change too small to see is lost.
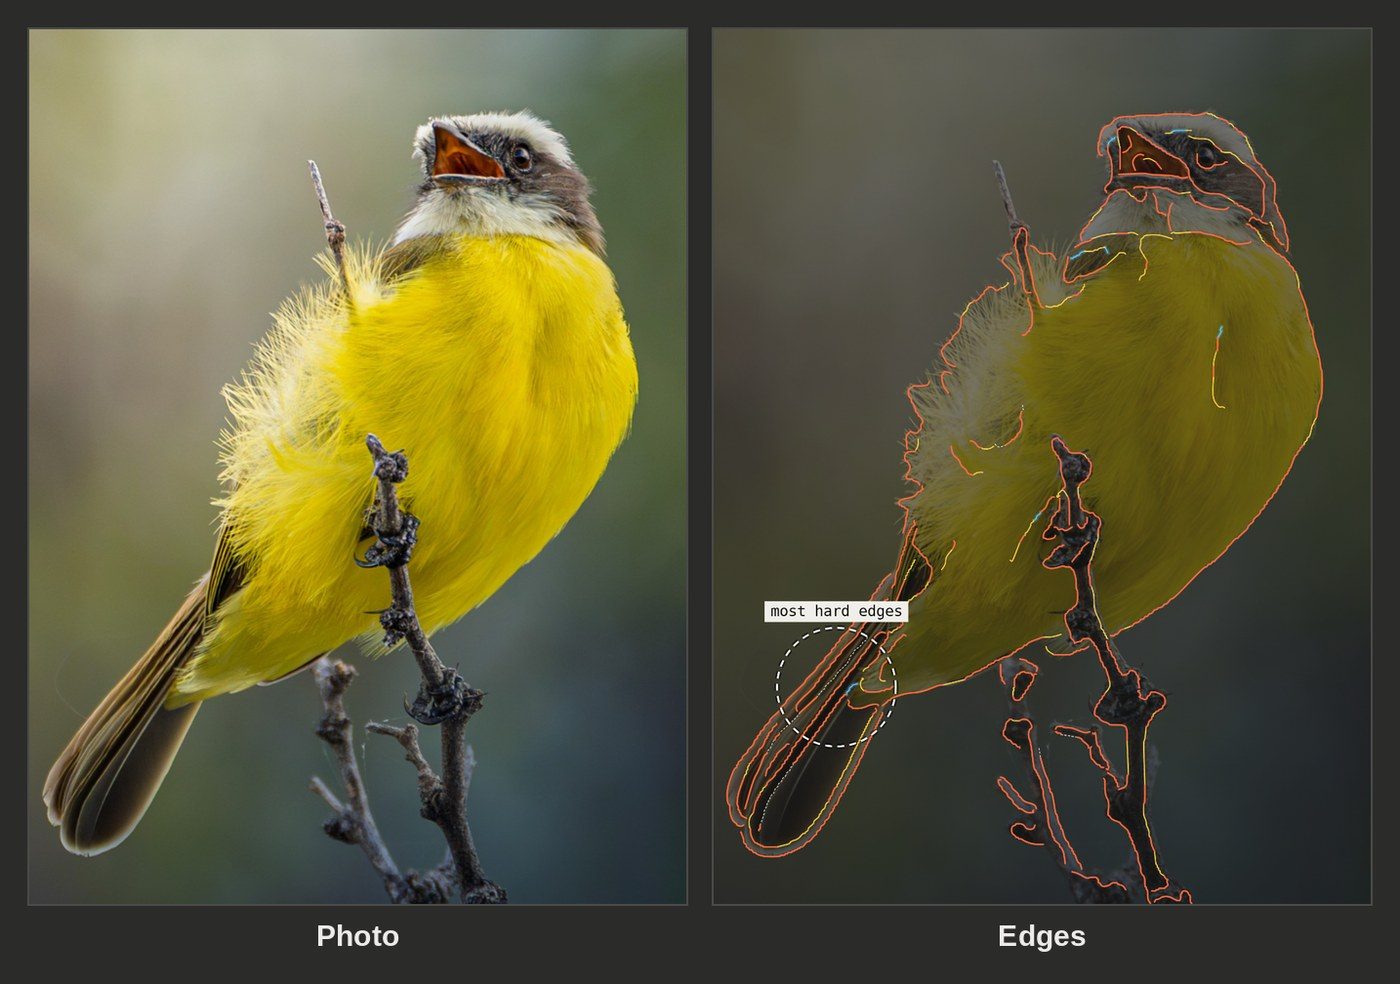
On the flycatcher, hard edges run along the silhouette against the out-of-focus background, the branch and the tail. Firm edges mark turns inside the bird, such as where the white throat meets the yellow breast, and the background itself has no edges at all.
Controls:
The Hard, Firm, Soft and Lost chips switch each type on or off.
Background sets what sits behind the lines: Faded, Photo, Gray or Dark.
Shapes chooses the scale: Big for the design, Middle for most work, Fine for details.
Sensitivity (1 to 9) finds more edges as it rises.
Edge character shows the share of each type, with advice. For the sample (61% hard, 23% firm, 15% soft, 1% lost): "Mostly hard edges. Lots of hard edges can look cut-out: soften the ones away from the focal point."
How to use it: keep your hardest edges and strongest contrast at the focal point. Soften edges in shadow and toward the borders, and lose an edge where two shapes share a value. In alla prima, make the edge as you lay the stroke rather than blending afterwards.
Tips:
Photos exaggerate hard edges, and lens blur fakes soft ones, so decide your edges by design. The flycatcher's fluffy breast feathers trace as a ragged hard edge; paint them soft, dragged out into the background.
If the circle lands where you don't want attention, soften edges there and sharpen them where you do.
11 · Color mixing
Color mixing gives each color family a base midtone recipe, then tells you what to add to that base for its light and its shadow. Every mix in a family stays related, which is what holds an alla prima painting together.
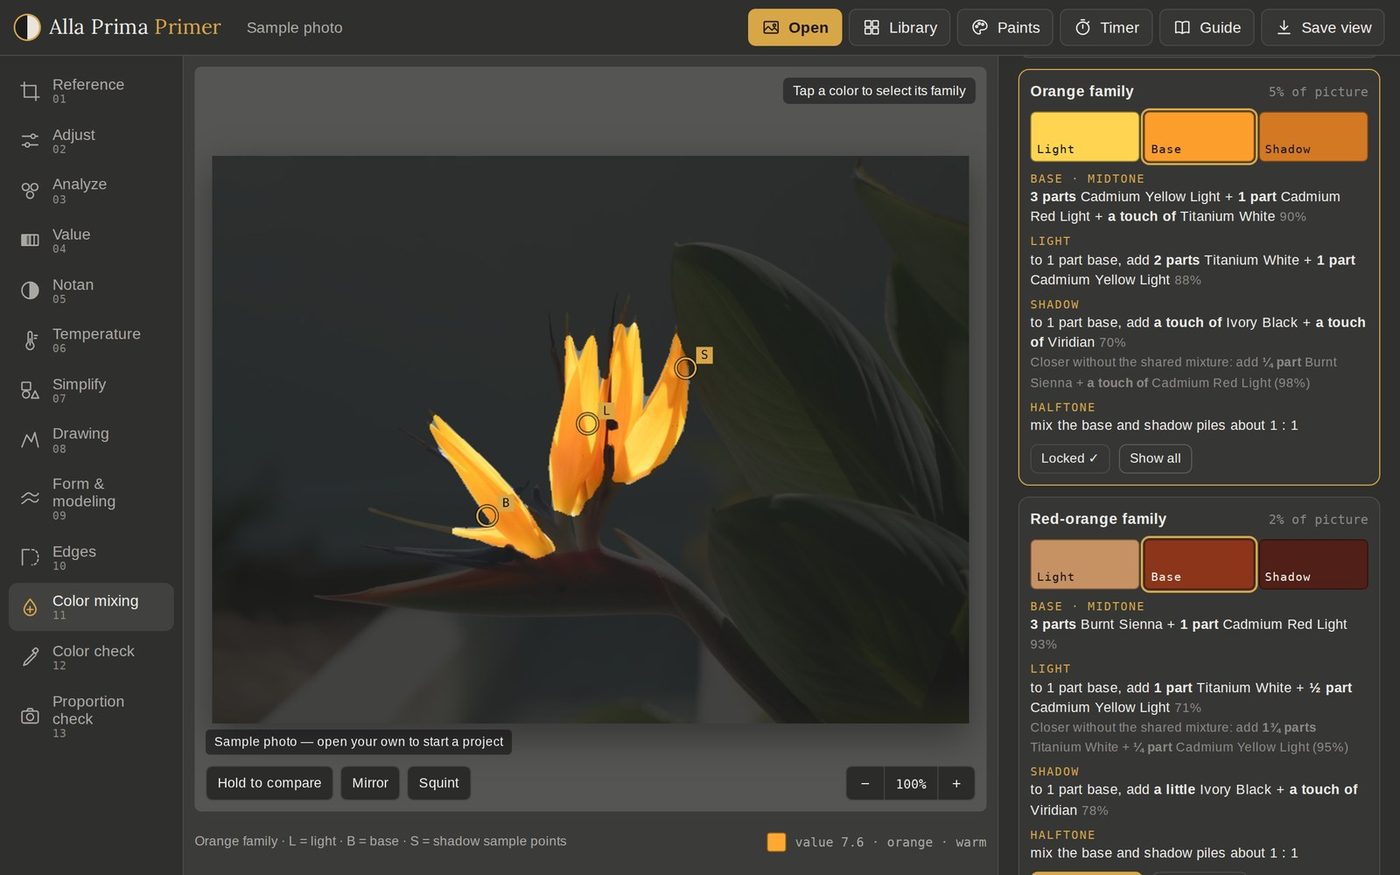
When: while you set up the palette, to premix your bases as piles. At the easel, whenever you need the light or shadow version of a color.
Find the families:
Found for me lists the local colors of the picture. How many sets 2 to 8 color families, and a Neutral grays family joins them when enough of the picture is gray. For the sample: Neutral grays, Blue, Dark yellow-green, Light yellow-green, Orange and Red-orange. When two families share a hue, Dark and Light tell them apart.
Tap an object builds a family from what you tap, such as a petal, a leaf or the sky. It gathers the light, base and shadow from every connected patch of the same hue. Raise Tolerance if it stops short; lower it if it spills over.
Read a family card:
| Line | What it tells you |
|---|---|
| Light, Base, Shadow strip | The three colors measured from the photo. |
| Base · midtone | The recipe for the base pile, with its match percentage. |
| Light | What to add to 1 part base for the light, such as "2 parts Titanium White + 1 part Cadmium Yellow Light" for the orange petals. |
| Shadow | What to add to 1 part base for the shadow, such as "a touch of Ivory Black + a touch of Viridian". |
| Halftone | Mix the base and shadow piles about 1 : 1. |
| Closer without the shared mixture | Appears when Unify is on and this family's own addition would match better than the shared light or shadow mixture. Use it where the exact color matters more than unity. |
Show where highlights the family on the image, with L, B and S where its light, base and shadow were sampled. Lock this base adds the family to your plan.
Mixing plan:
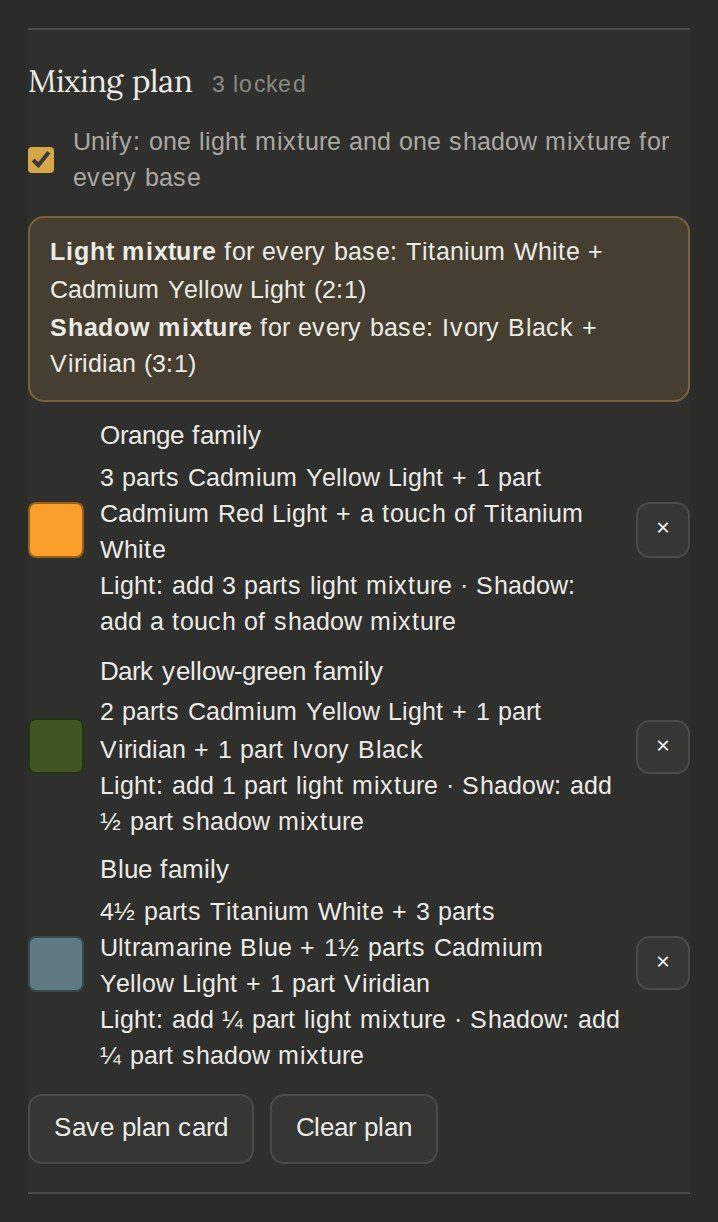
Lock the base of every family that matters: the big masses and the main objects.
Turn on Unify: one light mixture and one shadow mixture for every base. For the sample, the light mixture is Titanium White + Cadmium Yellow Light (2:1) and the shadow mixture is Ivory Black + Viridian (3:1).
Premix the two mixtures, then each locked base as its own pile.
Paint each area from its base pile. Add light mixture for the lights and shadow mixture for the shadows; mix base and shadow for the halftones.
Save plan card saves the plan as an image to keep beside your palette. × removes a base; Clear plan needs a second tap.
Tips:
Unify is the classic way to make one light fall on everything: the same light mixture touches every object, and the same shadow mixture darkens them.
A low percentage on a light or shadow line means the base can't get there with those additions. Use the closer mix underneath it, or add a paint in Paints.
Recipes change with your palette. Set Paints before you lock anything.
Premix enough of each base for the whole session. A color remixed halfway through rarely matches, and wet-into-wet leaves no time to hunt for it.
12 · Color check
Color check gives a recipe for any color, from your reference, another photo or a hex code. It can also borrow the color mood of another reference, and check the mix on your knife against the target.
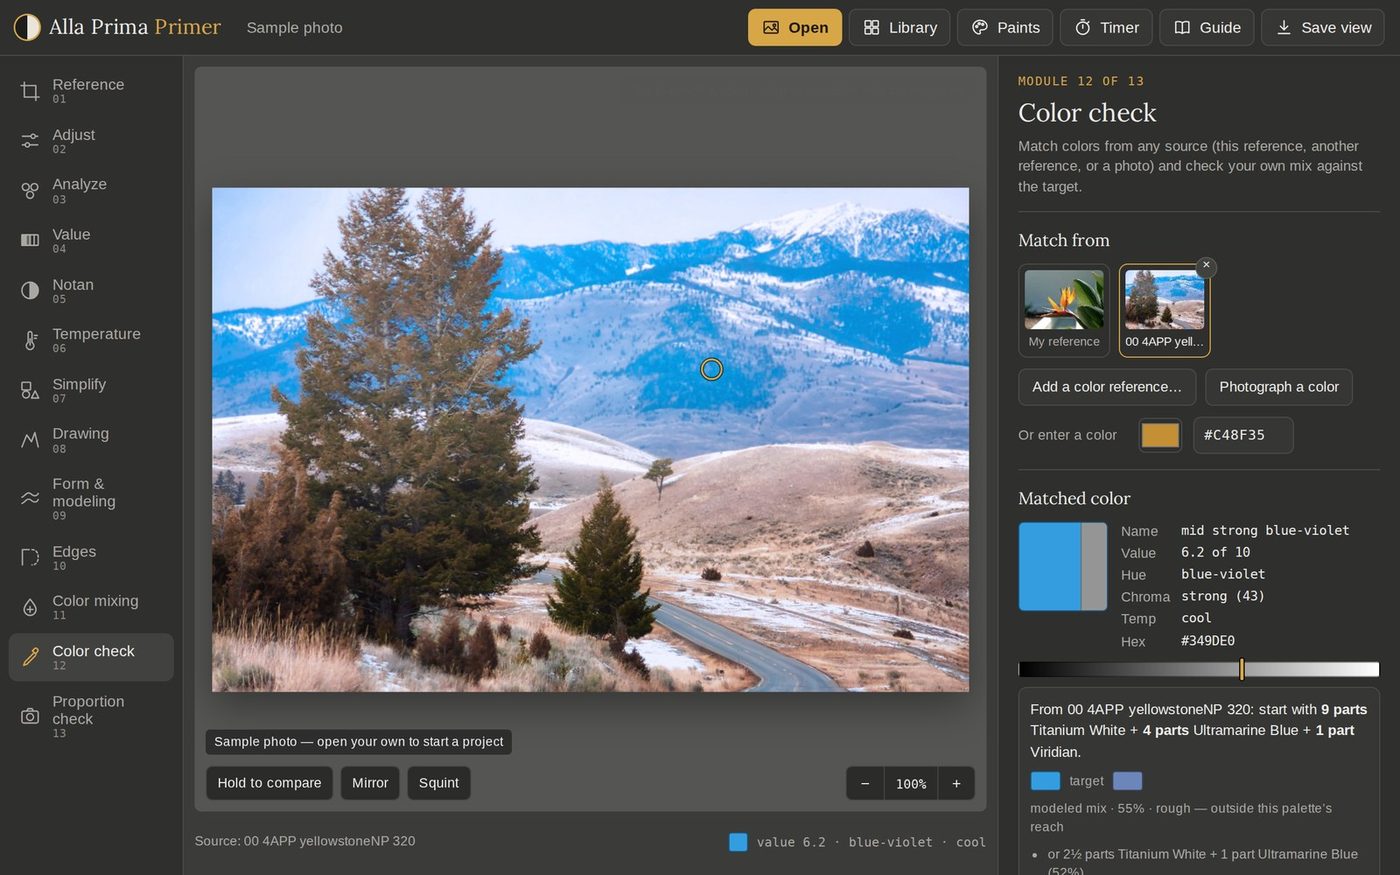
When: at the easel, whenever you need one exact color. Also when another image has color you want to learn from: a color study, a landscape you painted from life, a sunset.
Match a color:
Under Match from, choose My reference or a color reference. Add one with Add a color reference…, or Photograph a color with the camera. The × on a thumbnail removes it.
Tap the image to pick a color, and drag to fine-tune with the magnifier. Or type a hex code under Or enter a color.
The Matched color card gives the color's name, value, hue, chroma, temperature and hex code, with a recipe from your palette.
Palette of this source lists the source's main colors with recipes. Add all to my colors copies them into My colors in Analyze.
In the illustration, the blue of the distant mountains in the Yellowstone photo is a mid, strong blue-violet at value 6.2. The best Standard studio mix, 9 parts Titanium White + 4 parts Ultramarine Blue + 1 part Viridian, scores only 55%, outside this palette's reach. That's the cue to add a paint in Paints.
Borrow its color harmony: shown when a color reference is selected.
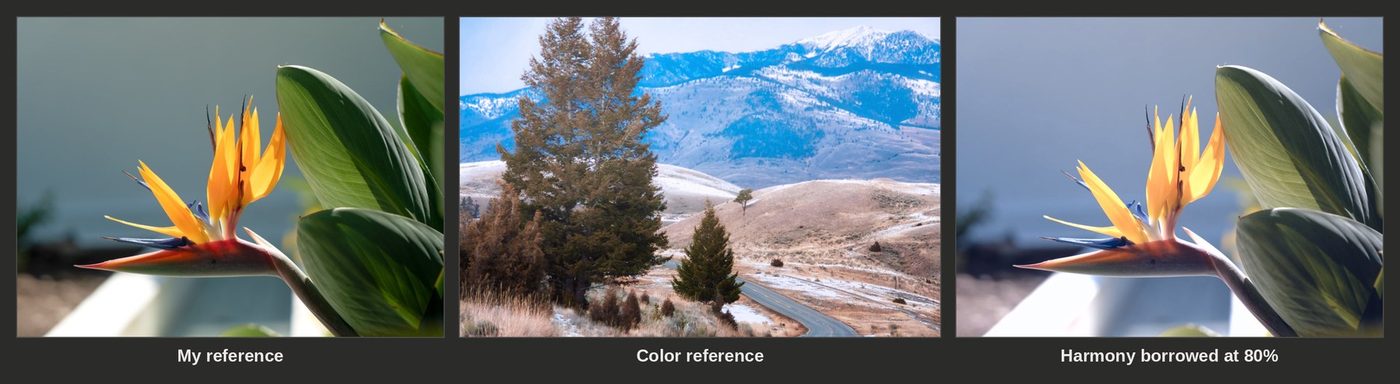
Raise Strength to recolor your main reference in the other image's color mood. Every module then plans in the new colors, and a "Color harmony borrowed" badge shows on the stage. Set Strength back to off to return to the original colors.
Use it to audition a palette before you paint. In the illustration, the Yellowstone's pale, cool winter light turns the bird of paradise lighter and bluer.
Check my mix:
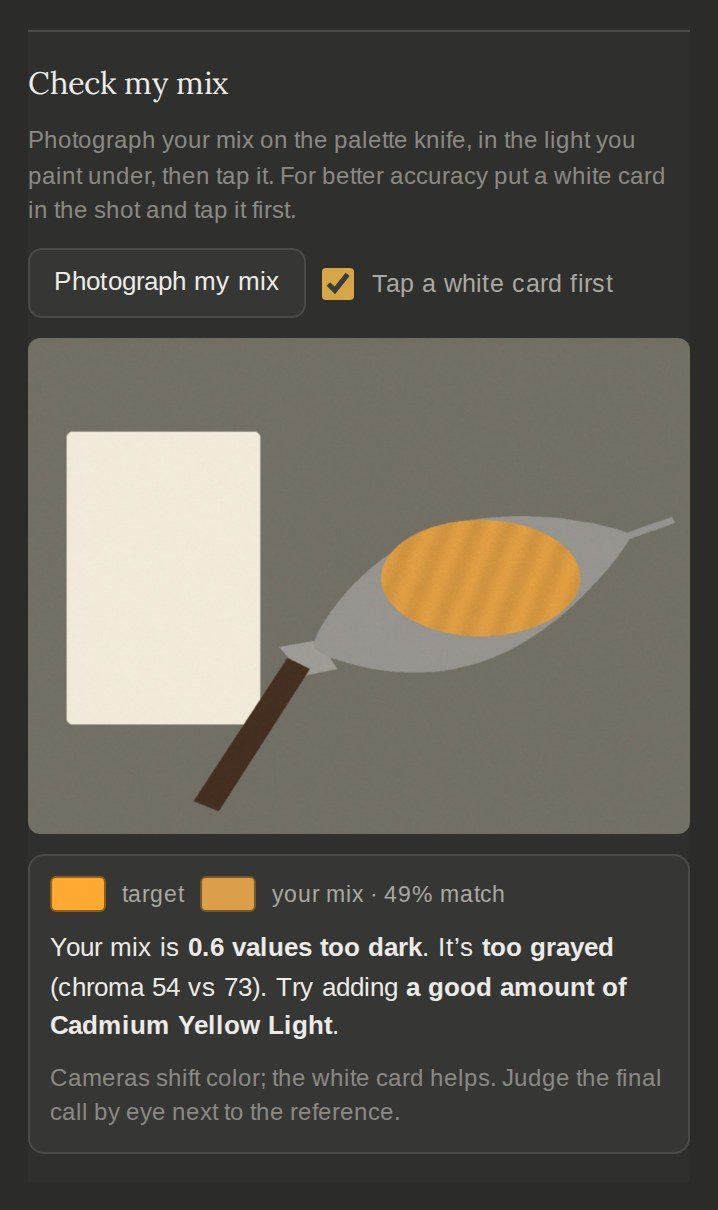
Set a target by tapping the reference or entering a color.
Put a dab of your mix on the palette knife, next to a white card, in your painting light.
Turn on Tap a white card first, then tap Photograph my mix.
Tap the white card, then tap the mix.
Read the verdict: the match percentage, how many values too light or dark, whether it's too warm, too cool, too intense or too grayed, and what to add.
In the illustration, the target is the lit orange of a petal: "Your mix is 0.6 values too dark. It's too grayed (chroma 54 vs 73). Try adding a good amount of Cadmium Yellow Light." A good mix reads "That's a match — paint it."
Tips:
The white card cancels the camera's color cast. Without it, results drift with your lighting.
Photograph straight on, with no glare on the wet paint.
Screens and cameras shift color, so make the final call by eye, next to the reference.
13 · Proportion check
Proportion check lines up a photo of your painting with the reference, then ghosts, flickers, wipes or differences the two so drawing and value mistakes stand out.
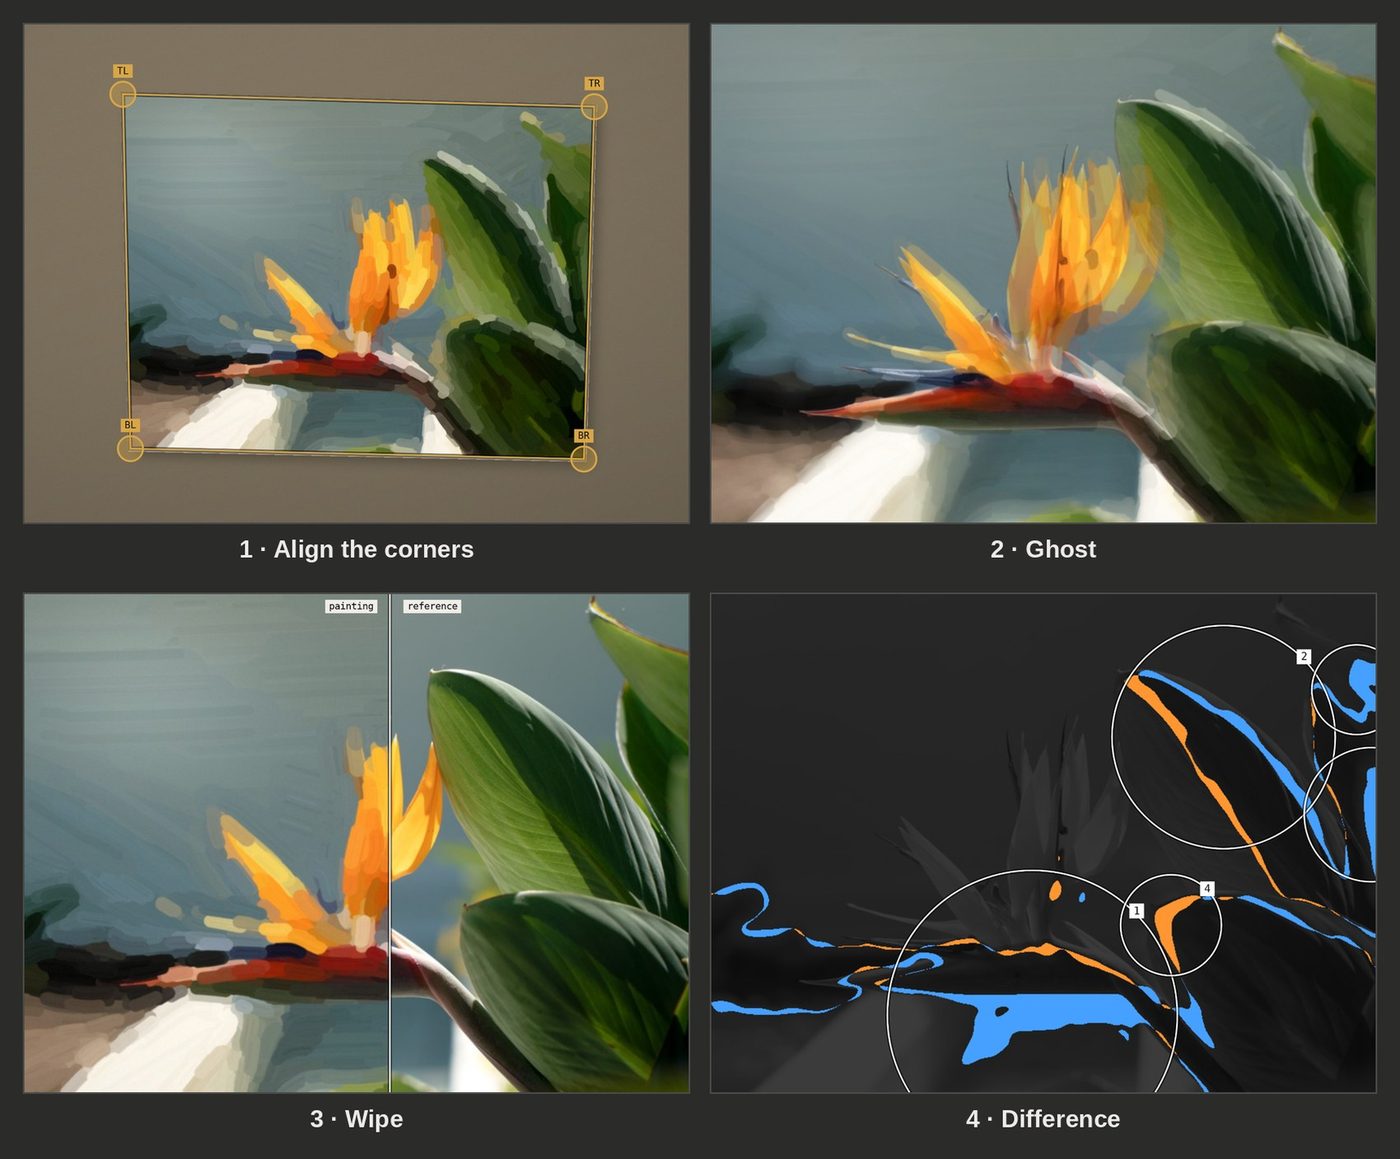
When: at natural pauses. Check after the drawing, after the block-in and before the final accents. A proportion error found at the drawing stage costs a minute; found at the end, it can cost the painting.
With a photo of your painting (the most precise way):
Choose Photo of my painting, then Take photo or Choose photo…. Shoot straight on, in even light, with all four corners of the canvas in the frame.
Drag the four handles (TL, TR, BR, BL) onto the corners of your canvas, using the magnifier. Tap Compare. Adjust corners brings the handles back.
Choose how to compare.
| Compare | What it does | Best for |
|---|---|---|
| Ghost | Lays the reference over your painting. The Reference slider sets how strongly it shows. | Seeing shapes that don't line up. |
| Flicker | Swaps painting and reference about every two-thirds of a second. | Letting movement show you the shifts. |
| Wipe | Painting on the left, reference on the right. Drag across the image to move the divide. | Checking one edge or value side by side. |
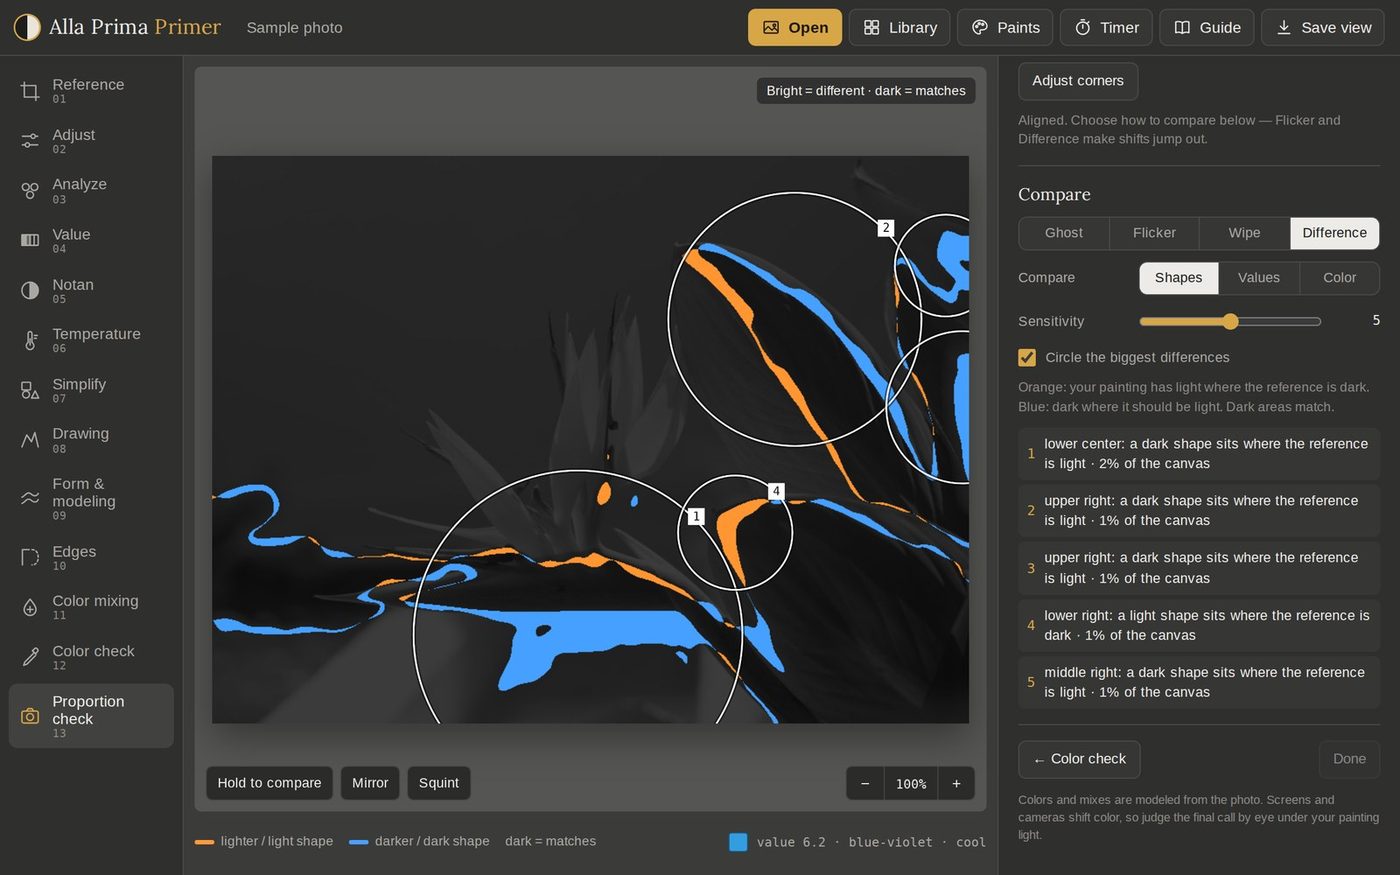
| Difference | Lights up whatever differs; dark means it matches. | Finding every mistake at once. |
Difference options:
Shapes compares the light and shadow shapes. Orange means you have light where the reference is dark; blue means dark where it should be light.
Values compares values after evening out exposure. Orange is lighter than the reference, blue is darker, and a brighter glow means a bigger difference.
Color glows yellow where color differs, after evening out the camera's color cast.
Sensitivity (1 to 9) shows smaller differences as it rises.
Circle the biggest differences numbers them on the image and lists each one in the panel, such as "lower center: a dark shape sits where the reference is light".
With the live camera (in the installed app, or wherever your browser allows the camera):
Choose Live camera, tap Start camera and point it at your painting.
The reference appears as a ghost over the live picture. Drag to move it, pinch or scroll to size it, and twist with two fingers to rotate it until it lines up.
Set Compare to Difference. Mistakes light up and matching areas go dark, live, as you move.
Freeze & align corners captures the frame and switches to the photo method for exact corner alignment.
Tips:
Fix the biggest glowing shapes first. Thin glows along every edge usually come from brushwork or a slight camera angle, not mistakes.
Use Shapes early (drawing and block-in), Values in the middle, and Color near the end.
A glow isn't always wrong. If you changed something on purpose, the difference is a design decision.
A painting session, start to finish
Plan with eight modules before you start the timer; at the easel, the Timer's four phases tell you which module to open next.
The diamonds are Proportion check stops: shapes after the block-in, values after the modeling, color before the accents.
Before you paint:
Reference: choose the canvas size and crop, and check that the photo is a good reference.
Adjust: recover clipped shadows and highlights, and correct the color.
Analyze: note the key and the main colors; confirm your palette in Paints.
Value: find the values of the lights, halftones and shadows.
Notan: make sure the design reads in two or three values.
Temperature: find the light-and-shadow pattern. Tone the canvas with the suggested ground, ideally ahead of time so it's touch-dry.
Simplify: check that layer 1 is a handful of big shapes.
Color mixing: lock the bases, turn on Unify, and premix the light mixture, the shadow mixture and a pile of each base. Save the plan card.
At the easel (start the Timer):
Block-in, first 20%: draw the envelope and the masses (Drawing stages 1 and 2) in thin paint, then mass in the shadow map (stage 3) with a thin, transparent wash. Block in the masses with Simplify's layer 1 and a large flat brush. Run a Proportion check on Shapes and fix the drawing now.
Modeling, to 70%: model the forms with Simplify's layer 2 and a medium filbert, in opaque paint laid into the wet block-in, taking every light and shadow from its base pile. Turn each form with its value planes. Use Color check and Check my mix for any color you're unsure of. Check Values.
Refine, to 93%: sharpen edges at the focal point and soften or lose the rest, then add layer 3's details with a small round and thicker paint in the lights. Check Color.
Accents, last 7%: place the darkest darks and brightest lights (values 1 and 10 on the value chart), the highlights in the thickest paint, and the accent colors at the focal point. Then stop.
At any point, hold Hold to compare to see the photo, tap Squint to see the big masses and how your strokes will blend, or tap Mirror to see your painting's design fresh.
Limits and troubleshooting
The app works from a photo, so treat its numbers as an informed starting point and let your eye make the final call.
What to keep in mind:
Mixes are modeled, not measured. The model knows each paint's color and tinting strength, but not its transparency, brand or how it shifts as it dries. Test the first mix of every pile.
Photos distort. Cameras compress values, shift color and flatten temperature. Adjust recovers some of it; plan from the photo, and trust life when you have it.
Light direction in Form & modeling is an estimate from the shading.
Planes and local colors come from values and colors, not from recognizing objects, so a plane or a family can spill into a background of the same value or hue.
Edges are traced from the photo. Lens blur can make an edge look soft or lost, and fine texture such as feathers or grass can trace as a ragged hard edge.
The live camera needs camera access in your browser, and some embedded web previews block it. Use Photo of my painting there, or the installed app.
Projects live in one browser on one device. Clearing the browser's site data deletes them, so save cards and views you want to keep.
| Problem | Fix |
|---|---|
| The photo looks flat, or the lights or darks are blank | In Adjust, pull Highlights down and push Shadows up, then add Contrast. Turn on the clipping display to check. |
| Recipes use paints you don't have | Open Paints and switch off what isn't on your palette. |
| One color always scores low | It's outside your palette's reach. Add a paint that can get there, such as a stronger red or blue. |
| The notan breaks into small pieces | Set Smoothing to Strong, or try Three values. |
| Simplify's layer 1 has too many shapes | Raise Big shapes ≥ or Simplify. |
| Edges shows too many or too few lines | Change Shapes (Big, Middle or Fine) or Sensitivity. |
| Measurements or brush widths show percentages | Choose a canvas size in Reference. |
| Difference lights up everywhere | Tap Adjust corners and realign, shoot straight on in even light, or lower Sensitivity. |
| Check my mix seems off | Turn on Tap a white card first and keep the card in your painting light. |
| The live camera won't start | Allow camera access in your browser settings. If it is still blocked, use Photo of my painting instead. |
| A save does nothing | Approve the save prompt if your browser shows one, then look in your browser's downloads. |
| A project is missing | Open the same browser on the same device. Otherwise, reopen the photo to start again. |